Thursday, February 27, 2014

Upcycled Books!

Good morning! leslierahye here to share with you one of my favorite types of arting : Upcycling!
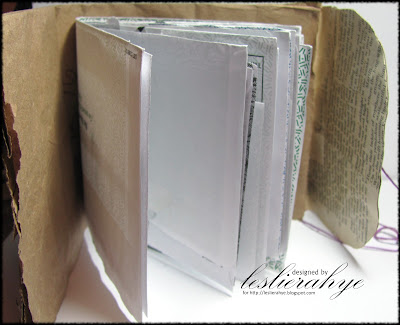
This is one of my upcycled books made from a lunch sack [from take out], envelopes from junk mail and bills, and old book paper.  After trimming the ends and edges of envelopes [leaving some as pockets and some as pages], I punched holes in the middle with my Japanese screw punch and then stitched the pages together and to the paper sack cover. The bottom of the sack was cut on 3 sides leaving a hinged "flap" to make a wrap-around cover. The flap was covered with book paper to provide stability. 


This type of handmade book is great for arting or journaling and fun to give as a gift. Thinner books are great additions to altered books providing artists with extra art space.  They can be glued in on the stitched edge.


Products used in the creation of this journal page : 
all upcycled items : paper sack, junk mail, books

More on tip ins and the ultimate in upcycling--Altered Books--NEXT MONTH as Altered Arts Magazine Blog takes on Altered Books!
Thank you for stopping by! I hope you enjoyed my project!

Monday, February 24, 2014

Altered Books - Preview


Altering books begins in my dreams.  I can express feelings, thoughts, and ideas within a cover.  It is almost like re-writing a book!  Notice how I incorporated the text in my art - "Creative Energy" is the title!

Next month is Altered Arts Magazine's Altered Book Month.  During this month, all posts will be related to anything and everything altered within books!

I have been altering books since the mid 1990s.  An artist's group I belonged to rescued a large amount of books from a library.  They were books that were old, and couldn't be sold, so they were going to be thrown out.  It felt amazing reclaiming these books.  To us, they were another canvas that is bound,  a way to carry and display art easily.


This altered book is from 2005, an art piece published in Altered Arts Magazine.

My favorite part of altering books, is the "round robin" aspect of creating.  All the artists involved did art on several pages, then passed the book to another artist.  When it was all done, each person who participated had a book filled with designs from several artists!  Breathtaking to display, inspiring to see the many styles of creating.


Altering encompasses any type or style book.  Paperback books, hard covers of various sizes, or even fabric books!  I have also saved ledgers, foreign books and have ripped pages out to re-use in other books. We revisit my favorite theme of upcycling - transforming items that would normally be thrown out.

In the next month, I want to showcase various techniques, tools, and media to inspire those wanting to delve into the unlimited realm of altered books.  The whole design team will cover all these various aspects with their own style and flair.  This gives the reader a great deal to choose from!


Not sure how to start?  Check out Kimberly's post on how to choose a book for altering!  This is a great post describing how to choose from the vast amounts of old books begging to have art created in it!!

For a beginner, the book above is a perfect way to start.  Contemplate collage and begin there.  After adhering several pages together (Check out a March post to learn how.), inks, paints, stickers, and embellishments were manipulated on the page to form the design.  Basic design ideals of symmetry, contrast, and repetition give the page a pleasing overall look.

Create your own gallery of art!  Display your books around the house.  Join a round robin so you have designs from several artists!  Not only are altered books like a journal housing your expressions, it is an easy way to keep themes or various art creations together.

Until next month.....


Cre8tivelea Yours - Lea


Friday, February 21, 2014

Junque Blooms Tutorial


I have a passion for paper, so of course I have stacks and stacks of it precariously perched on shelves and tucked into drawers in my studio. One of my favorite ways to use up some of this treasure trove is to create what I call Junque Blooms.


Any kind of paper will do for these pretty blooms. I especially love to use vintage sheet music, book paper, or sewing pattern tissue. For this bloom, I decided to use some some papers from the Graphic 45 Curtain Call collection. I love the neutral colors and interesting patterns!


To make the blooms, simply tear your favorite papers into small, medium, and large circles. You can also use punches or die cuts, but I prefer the shabby look of torn edges. Use a pencil to lightly sketch the circles in various sizes on the papers and then carefully tear around the lines. I used 4 different patterns in 3 sizes for a total of 12 circles.


Lightly spritz the paper circles with water and then crumple them to create texture. Be gentle, but don't worry if you get a tear or two, they just add character! Fold and unfold the circles 3 or 4 times for the best effect. The more you play with the paper, the more the fibers break down until it eventually feels like fabric or even leather. I brushed on some Twinkling H²Os Golden Nugget watercolor paint for a bit of sparkle. Stack the circles and then use a needle and some thread to stitch them together. Tie a secure knot and snip off the excess thread.


Use a strong adhesive like Crafter's Pick The Ultimate Glue to secure some ribbons on the back of the circles and to add a pretty center for your flower. I used a vintage clip-on earring with the back removed for my flower center. And now the Junque Bloom is complete!  I hope you will have fun using up all those papers in your stash to make some for yourself!
Kimberly


Wednesday, February 19, 2014

WINTER WREATH

I made this wreath for for the Winter 2014 issue of Altered Arts Magazine.  The theme was "All that Glitters".  This wreath was sprayed with glitter like crazy!  I also used glass glitter and glitter glue.  This wreath is a great recycling project because it is made with paper towel and toilet paper rolls. 


I used about 14 TP rolls and 5 PT rolls for this project. The first thing I did was run them through my Cuttlebug to flatten them.  Then, I cut them into 1" sections.  Because they are flattened, they make an oval shape.  I used a hoop that I've had for years as my shape to hot glue the ovals to.

 I glued them diagonally, and glued the end to the oval in front of it.  Here is the first row.

Then, you glue the ovals on the inside of the hoop in the same manner as the first row.  The outside second row is glued in between each oval but the end isn't glued down.  

I added yet another layer of ovals around he top and left side.  When all the ovals are on the hoop, spray paint your wreath.  It is the easiest way to color the rolls.  I finished the wreath with rolled paper flowers with tons of glitter on them and some gauze.  The buttons, resin pieces and hanger are from Melissa Frances


My wreath is proudly displayed on my front door.  When people come to the door they always tell me how pretty it is, and ask where I got it.  When I tell them it is made with toilet paper and paper towel rolls they are amazed!  I hope this inspires you to make something amazing!!

xxDaniella


Saturday, February 15, 2014

a pocket-size, hand-bound art journal

Recently a friend challenged me to make a hand bound book to
swap with her--she's much more skilled than I, but she knows I love
making books, bless her!

Here is the 4 x 4 inch art-type journal made just for her:
It has a wrapped, repurposed suede cover,
a simple button closure,
and five stitched signatures.

Do you make your own books?  How about altering books?  Join us here
at the Altered Arts Magazine blog for Altered Book Month in March.

Have a wonderful Saturday,
:)trisha

Thursday, February 13, 2014

A Pattern for Love Journal Page


Good afternoon! leslierahye here to share with you this fun journal page entitled A Pattern for LOVE. I layered pattern paper from a vintage pattern onto my K & P Imports art journal. I layered colors onto my tissue papers and Pink Paislee  Tag with Rangers Dylusions Ink Spray and Tattered Angels Mist. With Prima's Raspberry Red Chalk Ink, I edged the tag and the page and then sprinkled with gold embossing powder and heat set. Next I adhered the tag and some tape onto the page. I finished the page by doodling and writing little quips that provide advice for lovesuch as Be Kind.


Products used in the creation of this journal page : 
Kunst & Papier Art JournalK & P Imports
Designer Dries Clear—Art Glitter Adhesive
Color Wash Tags, Color Wash StampsPink Paislee
Card stock—Bazzill Basics
24K Gold—Globecraft&Piccolo Embossing Powder
Color Brush Twin (Black)c
Mod Podge (Matte)—Plaid Enterprises
Glimmer Mist (Vintage Pink)Tattered Angels
Dylusions Mist (White Linen, Funny Fuchsia, & Cherry Pie)—Ranger Industries
Chalk Inks (Raspberry Pie)Prima Marketing Inc.
Tissue Tape, Pattern Tissue Paper

Thank you for stopping by! I hope you enjoyed my journal page!

Wednesday, February 12, 2014

Somewhere In Time

Cyndi Duncan here.  I just wanted to let everyone know that I will be teaching classes at Artiscape Artist's retreat March 6-9th.  This wonderful event is held in Columbus, Ohio.  I have been participating in it for many years and can tell you that it is top-notch.  People travel from all over the country to attend.

Ever the perfectionist, I spent time the last couple of weekends making additional samples for my classes (I know - I'm crazy!).  Below are additional samples for my "Somewhere In Time Necklace" class.


 This image shows the raised detail on the front cover.
 
The inside images are from ARTchix Studio.  The cover image is from another company whose name I cannot recall.  I just recently switched computers and I know I have the name saved on the old one.  When I can, I'll let you know where it is from as they have wonderful collage images.


Monday, February 10, 2014

A Little Piece of my Heart - Melt Enamel Embellishments


Lea here with another technique just in time for Valentine's Day!!!  Create these lovely embellishments with a hot pot and embossing enamels.  Embossing enamels are thicker than regular embossing powders and are perfect for dimensional projects.

A hot pot works well with clear embossing enamels.  

Inks added to the clear enamels will create color.  Back in the day, I added mica powder colors to my clear enamel.  This not only added colors but a wonderful shine to the finished art.  We didn't have melt pots so we used clips, and a heat gun holder to heat the enamel from underneath first, then on top. Things are so much easier today!!!! 

Molds are used to create shapes or you can even use cookie cutters!  Suze Weinberg is the queen of everything enamels, and she inspired me to experiment and play with the enamels.  Molds are made for this purpose; there are molds for polymer clay, and even molds for candy and fondant baking elements.  
In addition, you can create your own molds!!!  Resins are popular, and there are compounds that are like putty so you can make molds from any charm or trinket laying around the house.

Another way to create embellishments is to put some clear enamel on a Teflon craft sheet.  Hold a heat tool 8 to 10 inches away (so not to blow the powder), and start to slowly melt the powder.  As it is melting add other EP (embossing powders), mica powders, little shards, or beads to the mix.  Keep adding more clear enamel on top.  Let dry.  Once dried, you can break pieces to use in your art.  If you have a flat mold sheet (for clay) or a stamp (inked with pigment ink), you can press that into the hot enamel before it hardens.  The result is so wonderful!!!  I save any broken shards to use as accents for future projects.


Here is how the melted enamels look melted in the pot.  It would look similar on the craft sheet.  I find the craft sheet is easier to add elements like beads to it, even charms.


This art is created by collaging on a scrap mat board.  A piece of paper is created with mica powders and webbing spray.  A molded element is then added, and then the scrap images.  Lastly, the key is added with the jump ring.


Experiment with this technique and see what you come up with.  Make batches of embellishments to have on hand for your next creative journey!!!

Cre8tivelea Yours - Lea

Friday, February 7, 2014

{Altered Books 101} Choosing a Book to Alter


A mysterious alchemy occurs when a book is altered. Suddenly, an object that was destined for the landfill is transformed into a piece of art and rescued from oblivion. Altering a book simply means changing its appearance or structure into something new using a variety of media and techniques. An altered book can be torn, painted, burned, collaged, have pages removed or added, or even be cut into an entirely different shape.


I fell in love with altered books many years ago, but I still hesitate a bit before I start a new one. I am passionate about books, and love and respect them deeply. That means that ripping them apart or marking in them with ink or paint can feel a bit strange! The end result is very satisfying though, and I prefer to believe that I'm rescuing books rather than destroying them. I choose the books that I alter very thoughtfully, and of course I would never use a rare edition, or valuable book. Instead, I focus on books that are tattered, worn, outdated, or no longer useful.


Choosing a book for altering is an adventure! I love digging through antique shops, thrift stores, rummage sales, or library sales for books that I can use for collage, handmade journals, or for altering into art. To make it easier for you to choose your own books for altering here are four basic criteria to consider, and a couple more suggestions for types of books to use.


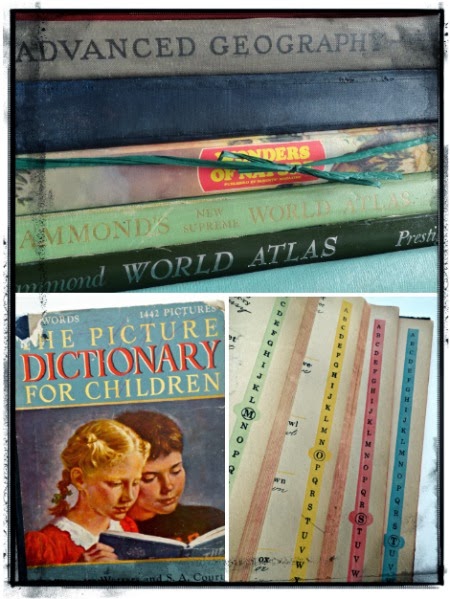
Size is the first factor we'll consider. Larger books obviously provide a bigger canvas for your techniques and art work. Atlases, outdated textbooks, and children's encyclopedias are some fun examples of these types of books. I love the children's book shown above that I found at an antique store recently. The charming illustrations on the cover and the colorful pages are perfect for altering. Large books have lots of potential, but smaller books are more portable and easier to display and store. Both have their place depending on the project at hand.


Ah...Reader's Digests! If you're a bit concerned about altering a book, these are the ideal choice for you. They're inexpensive and readily available at the sources I mentioned, or even online at sites like ebay. Reader's Digests often have lovely covers and end papers that can serve as beautiful backgrounds for your art. These books were mass produced so there's no need to feel guilty about using one as a creative base.


A second way to select a book is by color. I'm especially drawn to books that have white, cream, blue, or green covers, so I have quite a few of those in my collection. Color doesn't have to be a consideration however, because any book you find can be altered with paint, paper, or other media.


Collecting books by theme is a third and especially fun way to choose a book. Gathering books this way insures that you will have plenty of text and images for your art that reflect your interests. I can't pass up a book about birds, and I recently started looking for books about sailing. I enjoy using both these themes as motifs for collage, sketching, and painting. I also enjoy books about gardening, travel, vintage cookbooks, and music. Look for books that cover topics you are interested in, and they will be a pleasure to alter.


A fourth way to choose a book is to use one that has personal meaning for you. You may be drawn to a book for its title, subject matter, illustrations, the cover art, or even a childhood favorite. Of course, you can use your own treasured book, but I sometimes prefer to find another copy for altering. I've had the two books shown above since I was about 10. So even though they bear my daughter's name and would make a sweet journal for her, I may decide to find another copy and keep these as mementos. Children's classics are usually inexpensive and easy to find at used book stores or antique shops.


A wonderful type of book to consider for altering is the dictionary. They're available in a variety of sizes, colors, languages, and formats. Dictionaries contain loads of text and even images interspersed throughout their pages. Choose a page to alter that has a word or definition that pertains to your art work for adding depth and meaning.

Children's board books are another fun option to consider. Search dollar stores or yard sales for inexpensive copies. These books often have interactive elements like flaps, pockets, spinners, or fold-outs that can make your altered book interesting and unique.


When it comes to altering books the sky's the limit! I hope you enjoyed this glimpse into what I've learned about choosing books for altering. Next month, I'll share techniques for preparing books to be altered and some fun backgrounds to get you started. March has been declared Altered Books Month, here on the Altered Arts Magazine Blog, so be sure to pop by throughout the month for more inspiration and ideas from all the design team members.


Make art...be happy!
Kimberly


Wednesday, February 5, 2014

A little glitter goes a long way...

by Cyndi Duncan

I am blessed to be part of a wonderful art group.  A group of seven of us get together once a month and create lovely things.  One of the ladies from my group hosted a "holiday" craft party for a few of her friends right after the new year.  At the party we made these lovely glitter girls along with glitter houses.  How apropos considering that the winter issue of Altered Arts has "All That Glitters" as one of its themes.  This project was presented by my friend Lorel, so I can't claim any of the awesomeness. We each did personalize our creations, though,  through our selection of focal image and embellishments.

Monday, February 3, 2014

ALTERED RAT TRAP

Altering rat traps is so fun!  It is a great piece to alter, for a very small investment.
I started by removing the metal from the wood base of the Rat Trap.   I sanded the wood and adhered text paper to it.  I used Ranger Industries "Perfect Pearls" to make a faux patina on the metal.  I attached the Rat Trap to a mini hanger from Melissa Frances.  The resin flower on the lower left and the clothes pins on the top right are from her too.  
Some other Ranger products I used are: Pins, A Bottle, Pen Nib, Baubles, Sprocket and Stamps.  The flowers and Inks are from Prima.

Canvas Corp. twine made the bow, and I used some of their burlap on my trap, too.  A miscellaneous key and gauze finished it up!

I would love to see your altered rat traps!  Just leave a link and I'll be sure to check it out!  If you've never altered a rat trap, give it a try!  They are a fun and inexpensive way to use up your scraps!

xxDaniella

Saturday, February 1, 2014

a "love"ly collage . . .

Sorry, yes, I know, bad pun--but it's February now, and I'm thinking
of Valentines (and warmer weather) . . .
LOVE stamp and vellum bunting by Pink Paislee
wallpaper stamp by Something Tattered
collage image from Altered Pages
Now here's the question--make this a card front, or turn it into a hanging?
It's only 5 by 8 inches, so either way . . . what do you think?

Have a wonderful, creative Saturday, everyone!
:)trisha