Monday, March 24, 2014

For the Love of Altered Books!


            An example of a finished altered book page - layered with color, wording, silhouette, and stamps.

This is the last of my more regular posts for Altered Arts Magazine.  While I am busy with other artistic endeavors, I will be posting periodically as the occasion arises.  Altered Arts with Mixed Media is my heart and soul!!!  Keep a look on my blog and FB to view more ideas and art published in Altered Arts Magazine. Thank you all for your positive input. It has been so enriching helping those who need ideas and want to know more about "how to."  Keep emailing me and messaging for input.

I am in awe of all the posts by the design team showcasing tips, techniques, and glorious eye candy with art designed within books.

Although this is not an altered book, I felt it important to show other ways to upcycle books and create new, useful art.  Chipboard or wood is great when covered with old book pages.  I would make a copy of the page (One of my favorite books), adhere and cut with a knife.  Further embellishment can be achieved with watercolors, stencils, paints, and beads.

I am drawn to Victorian images, layering and collaging - fast and easy.  As shown on other posts, I adhere several pages in a book together to give strength to the surface.

Word paper is added on the left side and a collage image of the child.  The left side started by using a metallic, thick body paint for the background.  A quote is added with ribbon and grommets around it.  Punch out letters is added to the bottom.   Most times I like to express a thought, song, or feeling in my altered book art.

For those who do not want to do art in a pre-made book, you can make your own using other art you have created, along with scraps of left over cardstock.  2 pieces of Davy board (heavy bookmaker's cardboard) was used for the cover.  I have plenty of it on hand.

The cover was made by cutting some of my designed paste paper to fit over the Davy board.  The word "inspire" is stamped on the front.

A long scrap of cardstock is folded accordion style and glued to the inside cover.  Before that, the piece of cardstock is enhanced with oil pastels and layering of stamp images.


My last post showed using unusual media like wall glaze.  here I used wall glaze, watercolors, oil pastels, collage images, and embellishments.  The one embellishment by the "Dream" quote I handmade with mica powder, creating a mold, and thick embossing powders.

For those who like to scrapbook, here is a page on an old board book.  Inks were used on this page, however, chalks, and spray inks would be fabulous as a background as well!  Background paper was ripped, and scrapbook ephemera added.


In my last post (March 18th), art shown had tip in's and a pop up.  Tip in's do not have to be just a whole page, you can add a tip in in a shape like the hands above.  When the page is flipped, it looks like the hands are clapping!!!


Cutting, and shortening covers add excitement and texture to your books.  This was my display at CHA in 2007.

In "Board Book Play," by C&T Publishing, I created a mini necklace from a small board book.  Leather and Velcro tabs holds the cover closed.

I adore to create in board books.  Yard sales has many children board books for pennies!  Although, I have been sent blank books, I have a stash of children books - one's I wouldn't save for grandchildren, eaten and beaten books.

A window is cut out and a transparency printed out on my ink jet printer.  The image is my own graphic design.  Paper, paint, fibers, and a rub on complete the look.

Here is another two pages showcasing how to create art without using paint.  Scrapbookers love to create in this style as well as other paper artists.  There is even room for a photo to complete the page!  Add dimension by not collaging all elements flat, cut them out and use scrapbook Glue Dots (the thinnest dimension dot).

 By sponging paint colors when wet, the shades blend to form other colors.  Stamping on the background, embellishments and created graphic stickers convey my expression.


A close up of the pages and how sponging along with stamping create a 3D look beyond the embellishments!

This was from an alphabet "Round Robin" I participated in.  On the right side, I put the letters of the alphabet that each person was using in their designs.  When I received my book back, I knew who did what art on the various pages.  A fun index!!!


Many ways to alter books with various media!!!  Some art even makes a statement!!!


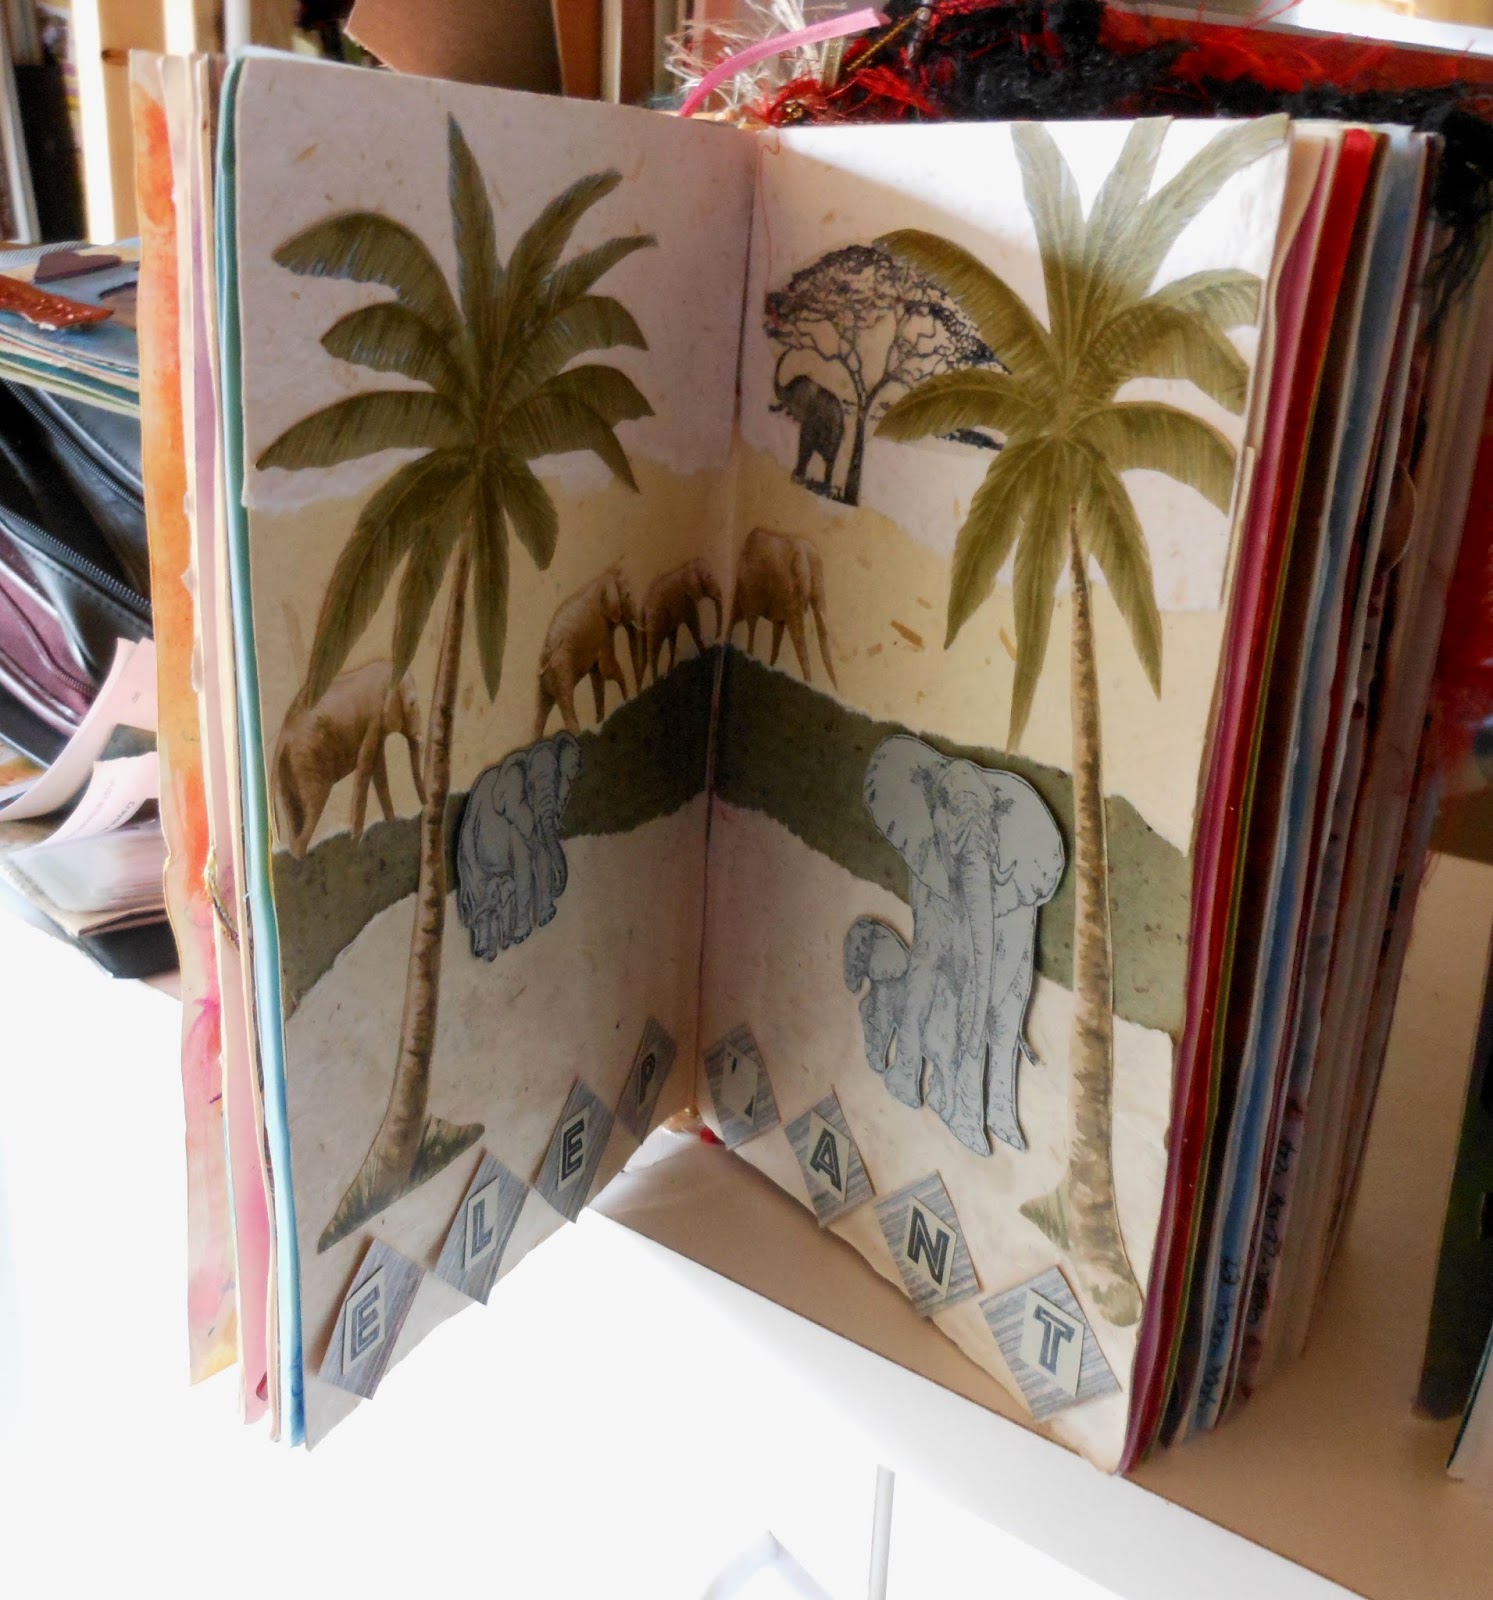
I'd like to end with some artwork my son did when he was 8 or 9 years old.  He is now 20!  This was a round robin that the organizer sent books with homemade papers.  My son wanted to be a part of the round robin and did this page on the organizer's book.  Children can learn to upcycle and reuse books in a very creative way!

I chuckle that the cat is drinking catnip, there is bones in a bottle, and the shirt has a stain.  Children are the most free and creative people I know!!!

I know there are so many ideas and examples on this post!  As always, I will be around to answer emails and messages on FB.  I am here to help and inspire when I can.

Thank You!

Cre8tivelea Yours - Lea

Friday, March 21, 2014

{Altered Books 101} Cover Story


The cover of an altered book often tells a story about what's inside. I chose a theme of Lost & Found for this book, so I wanted to embellish the cover in a way that reflects that idea. This book is all about the lost or discarded objects I love to find and collect for my art. I used some of those treasures for this cover, along with a few new tools and supplies to create a story that offers a glimpse of what's inside.


I loved the marbled turquoise cover of the Reader's Digest that I chose for this project, so I didn't want to cover it completely and lose the pretty pattern. Inspiration hit via Daniella's post about using tissue paper to cover her altered notebook! I covered the spine with a page torn from an old French book, and then I layered over the entire cover with tissue paper from 7gypsies. Matte gel medium from Liquitex worked well for both types of paper. I tore the edges of the tissue paper deliberately, revealing bits of the patterned cover and that gorgeous color!


A metal tag from Graphic 45 perfectly represented the sub theme of locks and keys found in the pages of the book. I used letter stamps from a fabulous vintage printer's set I recently scored on Ebay to stamp out the Lost & Found title. One of my favorite tips for using letter stamps is to choose the word you want to use, line up the letters, and then wrap the stamps together with Washi tape. This makes it so easy to stamp evenly spaced text! Some vintage trim from my stash and the word "Journal" stamped on a piece of cotton fabric finished off the cover.


I loved the 7 Gypsies tissue paper so much that I decided to use to create 2 simple backgrounds for the inside pages. I layered it over a piece of the French book page on the right, and directly on the book text on the left. Painted paper doilies and a bit more old book paper complete this set of backgrounds.


A page torn from a vintage postcard album that I found at an antique store and some of my cherished Liberty London fabric tape made for a quick and easy background! I can tuck a photo or a postcard in the grooves of the postcard page, or even some altered tags or ATC cards.
I hope you've enjoyed my posts during Altered Books Month here on the blog! I've learned some fun techniques from my fellow Design Team members that I can't wait try for my own books.
Until next time - make art...be happy!
Kimberly


Monday, March 17, 2014

NOT ALL ALTERED BOOKS HAVE TO START AS "BOOKS"...

We are enjoying Altered Book Month. So many wonderful ideas and tutorials.  I hope you've been visited us!

I am showing a journal I made with sponsor products, back in September.  This is an empty book that is just a book.  Wonderfully empty pages inside!  Just waiting for something to be written on them.  But books like this don't have to stay plain.  Altering the cover is a fun way to make a plain book your own.
SUPPLIES:


Gather your supplies.....

Take out just one piece of the collage tissue.  The sheets are super big and there are a lot in the pack.  Get your gel medium and a paintbrush.  Paint a thin layer of gel medium on the journal and place the tissue on top.  You can also collage the tissue onto the cover.  Either way it's a fabulous look.

After it is dry, rub the ink all over the tissue.

The ink is a subtle way of brightening the journal up.  The collage tissue is called "Life" and I circled all the "Life" words on it.  I also circled a few other words.  I added some gauze to the lower center of the journal and a piece of rope.  Then I placed the canvas tag on top, some corrugated cardboard and a little tag.  I glued the other piece of rope to the back.  Some gauze and flowers on the left, and a few paperclips on the right were the finishing touches.  I use this as a handwriting journal.

So, is this an altered book. or is it just a decorated book?  Is it good the way it was or did you hear it asking for a make over too?  

Keep visiting us here on the blog.  There are lots more Altered Book posts to come!!

Sunday, March 16, 2014

{Altered Books 101} Prep & Backgrounds


When it comes to altering books, the possibilities are endless. But it doesn't have to be a complicated process. With just a few simple materials, you can be on your way to creating an altered book in no time! All you really need to get started is a book, a glue stick, a ruler, and some clips. Use what you have on hand. Clothespins will substitute for the clips. A school ruler or a thick piece of cardboard cut to size will work perfectly for tearing pages. Most of us have books we no longer read taking up shelf space, and usually some kind of glue in a drawer or cupboard. Just grab what you have and let's get started!


The first step to altering a book is tearing out some pages throughout the book. Removing some of the pages makes room for the embellishments, photos, or ephemera that you might wish to add. It also keeps the the book from expanding too much on the fore edge, which reduces stress on the spine. I used a 1/4" steel rule to tear out my pages, but you can use a ruler or a piece of chipboard cut to the size you want.  I like the tattered edges created by tearing, but if you prefer even edges you can use a craft knife instead of tearing the pages. 


I divided my book into 5 sections and tore out 30 pages between each of them to create deep spacers for the bulky items I want to add to the book. Run a glue stick along all the edges of each section, and use the clips to hold them together while they dry. You can also use a tacky white glue or gel medium for this step.


I chose a theme of Lost & Found for this book, so I decided to include a quote on that subject, and a vintage escutcheon plate from my stash. The background was created with layers of white gesso, paint, scrapbook paper, a tea bag, and Stabilo and Derwent Inktense pencils. I used a vintage typewriter to type out the quote on paper torn from the book.


For this background, I layered white gesso, acrylic paints, the same pencils, and another typed quote. The circles were made with Yellow Ochre gouache. I used the cap to stamp the circles on the pages. 3 rusty keys from my collection were the perfect finishing touch! 


Clear gesso and pearlescent watercolors along with crumpled and torn tea bags created lots of texture and shimmer for this background. I love how the transparency of the watercolors and the tea bags allow the book text to peek through!


I hope you enjoyed this glimpse at some of the techniques I like to use for altered books. I'll be back on March 21st with 3 more background techniques, and the cover for this Lost & Found Journal. Until then, be sure to check out the great tips and techniques my fellow design team members have shared, and stay tuned for more inspiration as Altered Books Month continues!

Saturday, March 15, 2014

Little surprises around every corner--but nothing dangerous . . .

Easy-to-add flaps, doors, pockets, and pulls for altered books.


Interactive doors, pockets, and pulls add a little kinetic energy to any altered book.  Not only do they invite the reader to fully investigate the book, but they offer the reward of a little "reveal" when the door or flap is opened or the tag pulled.  Here are several simple pockets, flaps, doors, and pulls for you to consider adding to your next altered book project.  These are all from an altered book featuring baby-to-older-child photos: 

flap hinged at the top


large door hinged on right side


foldover, envelope type reveal


stitched pocket, opening at the side, with tag reveal

March is altered book month here at the Altered Arts Magazine blog, so be sure to check back often for more altered book ideas.

P. S. If you like the idea of flaps, doors, pockets, and pulls, I have several more from this same book posted at my blog:  easily amused, hard to offend--Little surprises around every corner . . .

Have a wonderful weekend,
:)trisha 

Thursday, March 13, 2014

Finding Your Niche in Altered Books--a quick how to

Happy Thursday everyone! leslierahye here to share with you one of my favorite processes for altered book making. I love the possibilities of old books holding treasure or chunky items! The stories where people hid money in a secret book compartment or keys to lock boxes and mysteries have always appealed to me. I've been in the homes of my professors and wondered if one of those books on their vast shelves contained a mystery beyond the cover of the book! I was thrilled many years ago when I attended a class at convention about altered books and the instructor shared with us the technique of creating a niche in a book for just such treasures! Over the years I've discovered what works best for me and I will share that with you today along with a few tips I've learned when working with used books.

1niche  noun \ˈnich also ˈnēsh or ˈnish\ 
a :  a recess in a wall especially for a statue
b :  something (as a sheltered or private space) that resembles a recess in a wall

I like to look for books at yard sales, library sales and used book stores. When looking at books I'm primarily looking for the condition of the spine and the type of binding as Kimberly discussed earlier. I am not concerned about stamped pages [like above] or writing in the book as the process to create the altered book will take care of those things. For instance a simple sanding [100 grit nail file] will remove the stamping from the stamped pages. Gesso/paint or other additives such as paper would easily cover up any writing in the book.


Since I am going to be cutting out of this book, I begin by determining how deep I want my niche [in this case ½"-5/8"]. I then find the page I want to start my niche and use foil to protect the rest of the book [I like to use foil because it won't stick to the glue and it I can wrap it around the book]. I then take white glue [PVA, school glue, or like] and generously rub glue on the page edges on the 3 sides of the book. This will hold the book together on the niche part. Depending on the book you might want to clamp it or rubber band it to dry. Some books are heavy enough and the weight of the pages and covers will suffice.

Once dry I get my cork-backed ruler and a utility knife to begin cutting my niche. The cork on the back of the ruler is useful to hold the ruler still especially for the beginning cuts. Make sure you keep sharp fresh blades near at hand...a dull blade not only will not do the job but can also be dangerous when attempting to cut. At the beginning you can simply cut straight down along your niche. As you get deeper in your removal, it is helpful to cut through the middle of the niche [in this case I would make an "x" and remove triangle shaped pieces out!]. As you work down, your corners might look "hairy." A sharp craft knife will help you get into the corners and shape those places better.  The image below shows where the corners have been shaped with the craft knife. Once your niche is deep enough for your item(s) and the edges are neat, use a file to sand any roughness left.

In my niche I wanted to put several boxes to place trinkets and such. I created simple boxes with card stock and folding. I measured my niche and determined what size boxes I would need. I wanted mine to be all the same size. My niche was 4½×5½"--so I made by boxes be ½×1½×2¼". To create these boxes I simply added 2" to the dimensions of the base--so 3½×4¼". The 2 inches allow for me to fold a ½" side on my box.

I scored [using pen in the example so that you can see] at the ½" and 1" mark from EACH edge. I creased my score marks and then folded up the long sides--gluing them to make them sturdier. I cut along the 1" line on the short ends so that I could fold in the flaps and fold the 1½" piece over the flaps. Because I was using card stock I trimmed the flaps so that they did not overlap under the fold over. I cut pieces from the book paper to fit in the bottom of the boxes.


To get my niche ready for my next process, I used an acrylic gesso on the book pages and placed my boxes into the niche to see how they look! As I complete this page I will actually glue the boxes down. I will complete this in my next post at the end of the month and share the rest of the book. I can't wait to add goodies to my shadowbox niche!!! I love how this is coming along! Be sure to check out Designer posts for the rest of the month as the Altered Arts Magazine team takes on Altered Books!