Showing posts with label Tutorials. Show all posts

Monday, September 15, 2014

Vintage Flashcard Dos-à-Dos Sketchbook


Vintage Flashcard Dos-à-dos Sketchbook by Kimberly Jones

Ever since I found a stash of jumbo vintage flashcards I've been thinking about various ways to use them for handmade books. With a generous length of 3.5" x 10.25" they proved to be ideal for a double-sided mini sketchbook!  It includes a mix of papers for jotting down notes and journaling, and watercolor paper for sketching, painting, or collage.


To make a Dos-à-dos book of your own you will need a few simple materials:

  • Vintage Flashcard {or cardstock or heavyweight paper}
  • Bone Folder or other Scoring Tool
  • Scissors
  • Decorative Tape or Masking Tape
  • Awl or piercing tool
  • Tapestry Needle with a large eye
  • Ribbon or other binding thread
  • A variety of paper including watercolor paper


Here's how to make the sketchbook:

  • Score the flashcard into thirds and fold.
  • Wrap tape around the spine to reinforce and embellish it.
  • Measure the paper for each side of the book. The paper should be the same height and 2X the width of each section. Fold the paper and stack 3 pieces together for each signature.
  • Pierce each section of the flashcard and the signature for in the center to create holes for stitching.
  • Thread the ribbon through the hole, wrap it around the spine, then go back through the same hole and tie a knot. Start on the outside of the cover and leave a long tail to wrap around the book as a closure.
  • Start on the inside of the second signature, wrap the ribbon around the spine, bring through the hole and tie a square knot. Snip off any excess ribbon.


An aerial view of the sketchbook shows both sides, one with watercolor paper, and the other with a mix of vintage book paper, handmade paper, a tag, and an old slide. The beauty of this type of book is that it can be made in a variety of sizes with an endless array of papers and binding threads or ribbons! Dos-à-dos is a French term meaning "back to back" and traditionally includes two separate books that are bound together, but this is my nod to that type of binding.


Here's the sketchbook all closed up with the ribbon and a sparkly clip-on earring to hold it in place. I already started embellishing the book with some vintage stamps from my stash, and some text and images from a book about birds. This will be a fun little book to tuck into my tote bag for sketching and collaging on the go! If you don't have flashcards this large, you can substitute any heavyweight cardstock or paper in the size you choose. I hope you'll enjoy making your own!
Until next time - make art...be happy!
Kimberly


Wednesday, May 7, 2014

Altered File Folder 6 Pocket Book


A happy day for me is spent cutting, pasting, painting, collaging, and making books! This altered file folder project combines all my favorite things in one colorful package!


I was inspired by these pretty papers from Lawn Fawn to use red, black, and a dash of blue for my main color palette.


The base for the book is a standard manilla file folder. A few simple folds are all you need to turn the folder into a book with 6 pockets! You can score at the fold lines if you wish, but I just folded away and burnished the fold lines with a craft stick. I prefer to make the folds before I begin adding any collage materials. The folder will be a bit bulky once you've added all those layers of paper, tape, and paint, so it's easier to manipulate if the folds are already created.


I added layers and layers of torn paper, acrylic paint, gesso, tissue paper, along with Washi tape, fabric tape, and masking tape. Just play with your favorite materials and techniques until you've covered all parts of the folder, or just the parts that will be seen if you prefer!


The inside of the book has two pockets. I tucked in some glittery postcards from the amazing Book for Paper Lovers by Flow magazine, and a quote from that same book that I cut apart. {See a flip-through of this fabulous book on my Instagram account @artfullvintage}


Here's the back cover of the book. The glittery postcard is tucked into one of the side pockets, and a large manilla tag is in the other pocket.


Creating the side pockets is very simple. Just add double-sided tape to the top and bottom edges of the folder as shown. I'm showing the plain folder here, but be sure to add the tape AFTER you have finished collaging the folder!

I hope you enjoyed this fun and easy project and that you will make some file folder books using your favorite colors and materials. Happy altering!
Kimberly

Thursday, April 3, 2014

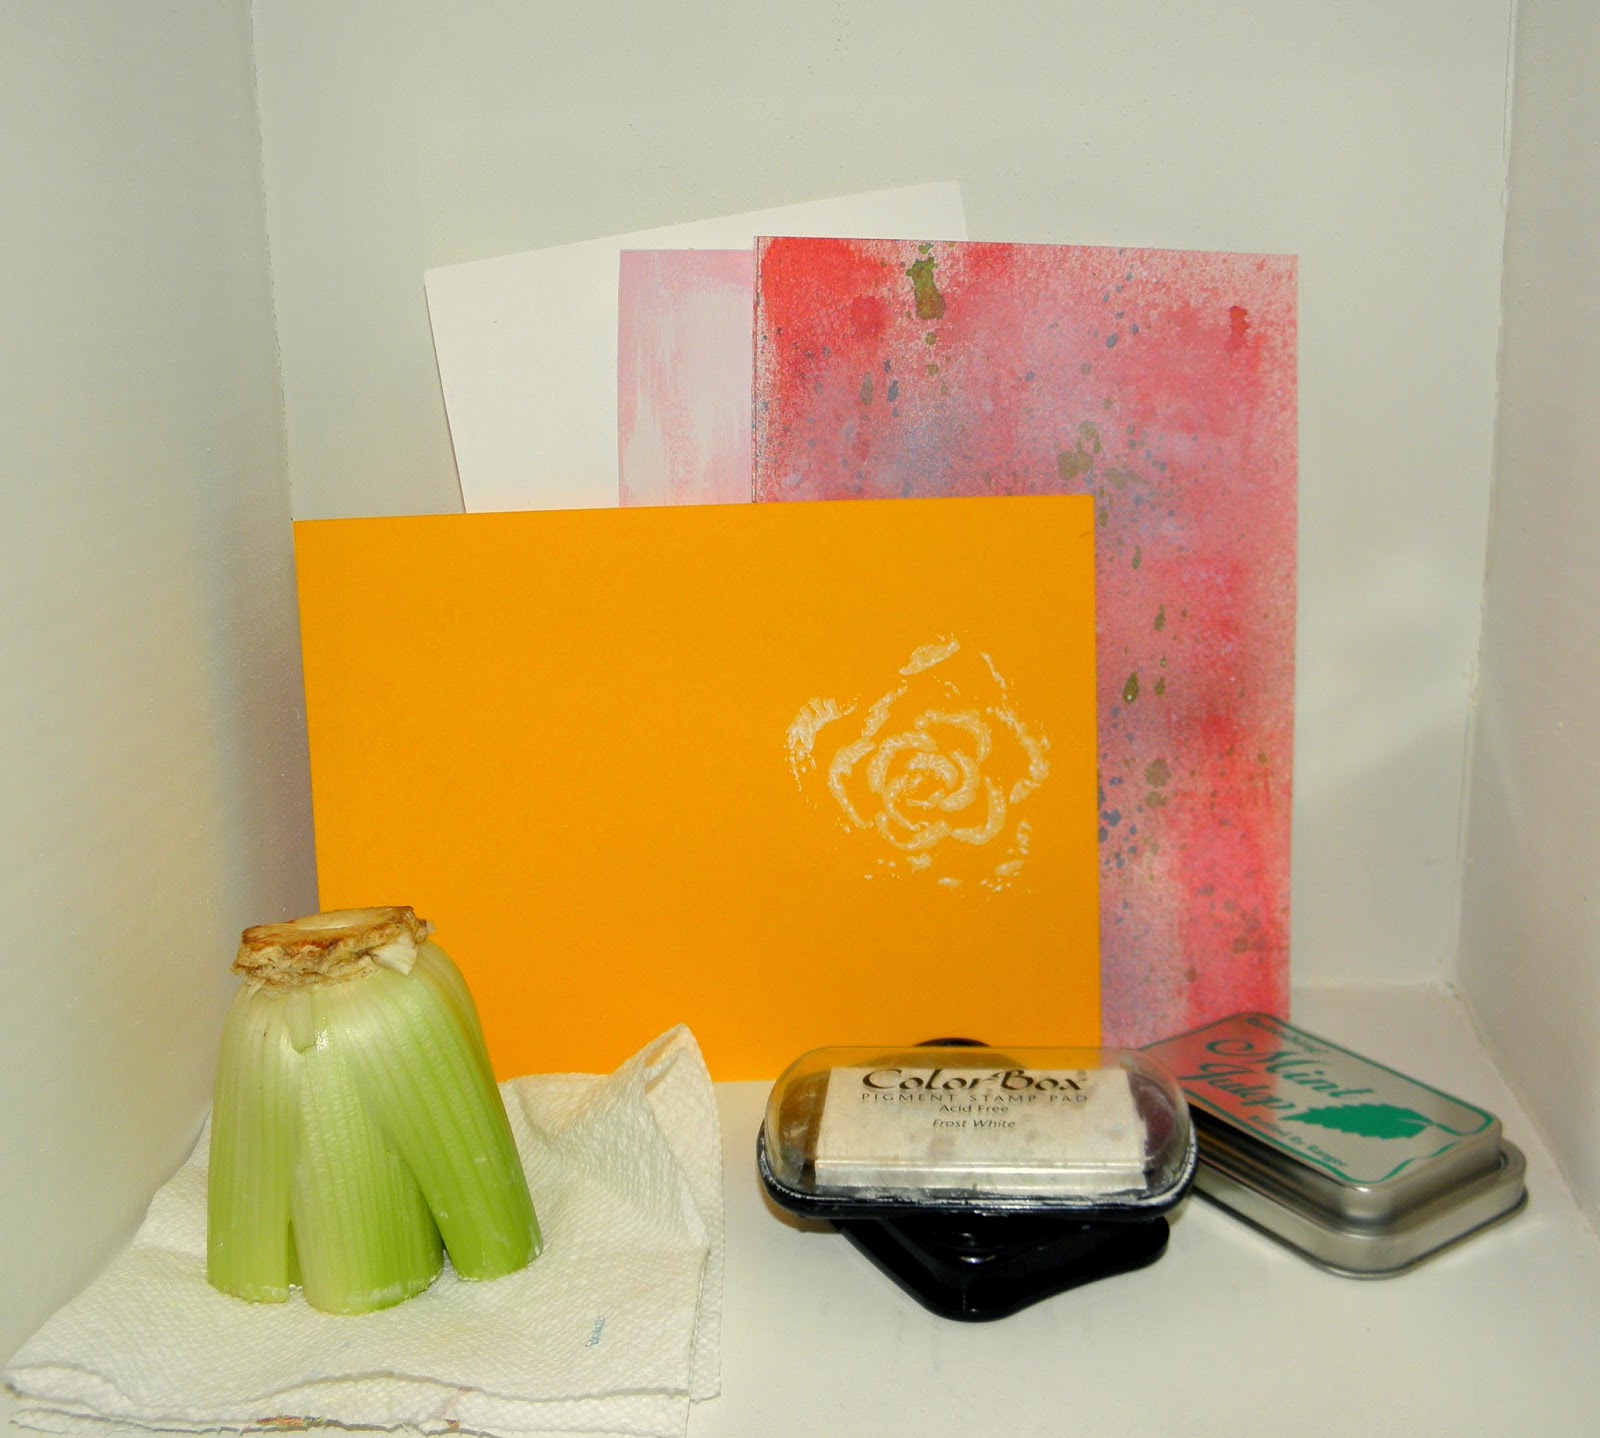
CELERY STALK ROSES

I have a fun project to share today!  I wrote an article about it in the Winter 2014 Issue of Altered Arts Magazine.

All you need is a nice thick paper, like watercolor paper, A stalk of celery and some inks.  Cut a straight cut across the bottom of the celery, about 2 inches from the bottom. 

 I used acrylic paint and inks to make some backgrounds.  Then, I applied ink to the celery and stamped!


How awesome is that?  They look like roses!


Just use a baby wipe to take the ink off of your celery (or cut a little bit off to get fresh celery again) and you are ready to stamp again.


All different colors of "roses"  for beautiful backgrounds.  Or, stamp them as a focal point on a card, fabric or anything.  That's the fun of art!

Who ever said you can't play with your food?

*No celery were wasted during the making of these backgrounds.  I put cream cheese and olives on the stalks and we enjoyed them very much.*

Sunday, March 16, 2014

{Altered Books 101} Prep & Backgrounds


When it comes to altering books, the possibilities are endless. But it doesn't have to be a complicated process. With just a few simple materials, you can be on your way to creating an altered book in no time! All you really need to get started is a book, a glue stick, a ruler, and some clips. Use what you have on hand. Clothespins will substitute for the clips. A school ruler or a thick piece of cardboard cut to size will work perfectly for tearing pages. Most of us have books we no longer read taking up shelf space, and usually some kind of glue in a drawer or cupboard. Just grab what you have and let's get started!


The first step to altering a book is tearing out some pages throughout the book. Removing some of the pages makes room for the embellishments, photos, or ephemera that you might wish to add. It also keeps the the book from expanding too much on the fore edge, which reduces stress on the spine. I used a 1/4" steel rule to tear out my pages, but you can use a ruler or a piece of chipboard cut to the size you want.  I like the tattered edges created by tearing, but if you prefer even edges you can use a craft knife instead of tearing the pages. 


I divided my book into 5 sections and tore out 30 pages between each of them to create deep spacers for the bulky items I want to add to the book. Run a glue stick along all the edges of each section, and use the clips to hold them together while they dry. You can also use a tacky white glue or gel medium for this step.


I chose a theme of Lost & Found for this book, so I decided to include a quote on that subject, and a vintage escutcheon plate from my stash. The background was created with layers of white gesso, paint, scrapbook paper, a tea bag, and Stabilo and Derwent Inktense pencils. I used a vintage typewriter to type out the quote on paper torn from the book.


For this background, I layered white gesso, acrylic paints, the same pencils, and another typed quote. The circles were made with Yellow Ochre gouache. I used the cap to stamp the circles on the pages. 3 rusty keys from my collection were the perfect finishing touch! 


Clear gesso and pearlescent watercolors along with crumpled and torn tea bags created lots of texture and shimmer for this background. I love how the transparency of the watercolors and the tea bags allow the book text to peek through!


I hope you enjoyed this glimpse at some of the techniques I like to use for altered books. I'll be back on March 21st with 3 more background techniques, and the cover for this Lost & Found Journal. Until then, be sure to check out the great tips and techniques my fellow design team members have shared, and stay tuned for more inspiration as Altered Books Month continues!

Thursday, March 13, 2014

Finding Your Niche in Altered Books--a quick how to

Happy Thursday everyone! leslierahye here to share with you one of my favorite processes for altered book making. I love the possibilities of old books holding treasure or chunky items! The stories where people hid money in a secret book compartment or keys to lock boxes and mysteries have always appealed to me. I've been in the homes of my professors and wondered if one of those books on their vast shelves contained a mystery beyond the cover of the book! I was thrilled many years ago when I attended a class at convention about altered books and the instructor shared with us the technique of creating a niche in a book for just such treasures! Over the years I've discovered what works best for me and I will share that with you today along with a few tips I've learned when working with used books.

1niche  noun \ˈnich also ˈnēsh or ˈnish\ 
a :  a recess in a wall especially for a statue
b :  something (as a sheltered or private space) that resembles a recess in a wall

I like to look for books at yard sales, library sales and used book stores. When looking at books I'm primarily looking for the condition of the spine and the type of binding as Kimberly discussed earlier. I am not concerned about stamped pages [like above] or writing in the book as the process to create the altered book will take care of those things. For instance a simple sanding [100 grit nail file] will remove the stamping from the stamped pages. Gesso/paint or other additives such as paper would easily cover up any writing in the book.


Since I am going to be cutting out of this book, I begin by determining how deep I want my niche [in this case ½"-5/8"]. I then find the page I want to start my niche and use foil to protect the rest of the book [I like to use foil because it won't stick to the glue and it I can wrap it around the book]. I then take white glue [PVA, school glue, or like] and generously rub glue on the page edges on the 3 sides of the book. This will hold the book together on the niche part. Depending on the book you might want to clamp it or rubber band it to dry. Some books are heavy enough and the weight of the pages and covers will suffice.

Once dry I get my cork-backed ruler and a utility knife to begin cutting my niche. The cork on the back of the ruler is useful to hold the ruler still especially for the beginning cuts. Make sure you keep sharp fresh blades near at hand...a dull blade not only will not do the job but can also be dangerous when attempting to cut. At the beginning you can simply cut straight down along your niche. As you get deeper in your removal, it is helpful to cut through the middle of the niche [in this case I would make an "x" and remove triangle shaped pieces out!]. As you work down, your corners might look "hairy." A sharp craft knife will help you get into the corners and shape those places better.  The image below shows where the corners have been shaped with the craft knife. Once your niche is deep enough for your item(s) and the edges are neat, use a file to sand any roughness left.

In my niche I wanted to put several boxes to place trinkets and such. I created simple boxes with card stock and folding. I measured my niche and determined what size boxes I would need. I wanted mine to be all the same size. My niche was 4½×5½"--so I made by boxes be ½×1½×2¼". To create these boxes I simply added 2" to the dimensions of the base--so 3½×4¼". The 2 inches allow for me to fold a ½" side on my box.

I scored [using pen in the example so that you can see] at the ½" and 1" mark from EACH edge. I creased my score marks and then folded up the long sides--gluing them to make them sturdier. I cut along the 1" line on the short ends so that I could fold in the flaps and fold the 1½" piece over the flaps. Because I was using card stock I trimmed the flaps so that they did not overlap under the fold over. I cut pieces from the book paper to fit in the bottom of the boxes.


To get my niche ready for my next process, I used an acrylic gesso on the book pages and placed my boxes into the niche to see how they look! As I complete this page I will actually glue the boxes down. I will complete this in my next post at the end of the month and share the rest of the book. I can't wait to add goodies to my shadowbox niche!!! I love how this is coming along! Be sure to check out Designer posts for the rest of the month as the Altered Arts Magazine team takes on Altered Books!

Friday, February 21, 2014

Junque Blooms Tutorial


I have a passion for paper, so of course I have stacks and stacks of it precariously perched on shelves and tucked into drawers in my studio. One of my favorite ways to use up some of this treasure trove is to create what I call Junque Blooms.


Any kind of paper will do for these pretty blooms. I especially love to use vintage sheet music, book paper, or sewing pattern tissue. For this bloom, I decided to use some some papers from the Graphic 45 Curtain Call collection. I love the neutral colors and interesting patterns!


To make the blooms, simply tear your favorite papers into small, medium, and large circles. You can also use punches or die cuts, but I prefer the shabby look of torn edges. Use a pencil to lightly sketch the circles in various sizes on the papers and then carefully tear around the lines. I used 4 different patterns in 3 sizes for a total of 12 circles.


Lightly spritz the paper circles with water and then crumple them to create texture. Be gentle, but don't worry if you get a tear or two, they just add character! Fold and unfold the circles 3 or 4 times for the best effect. The more you play with the paper, the more the fibers break down until it eventually feels like fabric or even leather. I brushed on some Twinkling H²Os Golden Nugget watercolor paint for a bit of sparkle. Stack the circles and then use a needle and some thread to stitch them together. Tie a secure knot and snip off the excess thread.


Use a strong adhesive like Crafter's Pick The Ultimate Glue to secure some ribbons on the back of the circles and to add a pretty center for your flower. I used a vintage clip-on earring with the back removed for my flower center. And now the Junque Bloom is complete!  I hope you will have fun using up all those papers in your stash to make some for yourself!
Kimberly


Tuesday, January 21, 2014

Altered Birch Magnets


The moment I spotted these birch discs at Michael's, I knew they would be perfect for altered magnets. Add in a collage sheet from ARTchix Studio, and you have a quick and easy project to spruce up your memo board!


Here are the birch discs before altering. So many possibilities! I think these would be sweet for pendants or charms too. I love the little squiggly bits of bark, so I left those, but you can easily snip them off for a cleaner look.

Altered Birch Magnets Supplies by Kimberly Jones

To create some magnets for yourself or a friend you just need a few basic supplies:
*Collage Images - "Lovely Lenses" ARTchix Studio
*Birch Discs
*Sharp Detail Scissors {Or a circle punch if you prefer}
*Gel Medium or Decoupage Medium {I used Liquitex Matte Medium, but any kind will work
*Inexpensive Paint Brush
*Embellishments {rhinestones, beads, buttons, etc.}
*Tacky Glue - "The Ultimate" - Crafter's Pick

Altered Birch Magnets Tutorial by Kimberly Jones

Follow these steps to create the magnets:

*Begin by selecting the collage images you want to use for the magnets.
*Cut or punch out the images to fit on the birch discs.
*Use gel medium to glue the image to the disc and add a coat to the top to seal.
*Add embellishments with tacky glue.
*Add a self-adhesive magnet to the back of the disc.

Some fun alternatives for the collage images would be monograms, buttons or other embellishments, found objects...the list is endless! I hope you enjoyed the tutorial and have fun making your own magnets!

Kimberly