Showing posts with label DT lesilerahye. Show all posts

Wednesday, January 28, 2015

Matchbox Love


Happy Wednesday everyone! leslierahye here sharing with you an altered match box that I recently created. The theme is love. 

 One section of the inside has a lock and key on a red and lace background. Another section contains a note in a bottle, with a rose and a piece of a romance novel. The final section contains wooden word blocks spelling out the word love. 

The cover has bits from the novel, a bit of stamping and some feathers, beads, glitter and bakers twine. a picture hanger functions as a pull for the box with a heart charm dangling from some twine.


I hope you enjoyed my project! Thank you for stopping by!


Sunday, July 27, 2014

Every little thing wants to be loved.

Hi everyone! leslierahye here with a recent Altered Trading Card Swap. ATCs are meant to be traded among artists and that's why they are so fun to make. This little 2½×3½" work of art will be shared with other artists making ATCs along the same theme--this theme was Bees. They also will make a run of cards on this theme and our hostess will sort out the lot and send them to each of us. It's always fun to get back the cards and see everyone's artwork!
I chose to use this quote from The Secret Life of Bees for my ATC. This is part of the Bee Yard Etiquette and while assembling them I became inspired to do a series of Bee ATCs--I will share those with you at a later date!

“I hadn't been out to the hives before, so to start off she gave me a lesson in what she called 'bee yard etiquette'. She reminded me that the world was really one bee yard, and the same rules work fine in both places. Don't be afraid, as no life-loving bee wants to sting you. Still, don't be an idiot; wear long sleeves and pants. Don't swat. Don't even think about swatting. If you feel angry, whistle. Anger agitates while whistling melts a bee's temper. Act like you know what you're doing, even if you don't. Above all, send the bees love. Every little thing wants to be loved.” 
― Sue Monk KiddThe Secret Life of Bees


Thank you for stopping by!

Sunday, July 13, 2014

Vintage Ornament


Happy Sunday everyone! leslierahye here celebrating Christmas in July! I begin creating for the holiday season in July so that I can get all of my projects completed in time for gift giving and decorating. One of my favorite holiday crafts is making ornaments for our tree and for gifts. This ornament is created by making cones out of 2½-3" square pieces of book paper. Each square is formed into a cone and then glued and dipped into vintage gold glitter. Once the cones are dry, They are layered on a shape--a circle or star--and then a circle, a button or other focal piece is placed over the tips to both disguise the tips and to provide stability to the ornament. A string to function as a hanger is added to the back.

 I hope you enjoyed my ornament! Thank you for stopping by!

Friday, June 27, 2014

Love


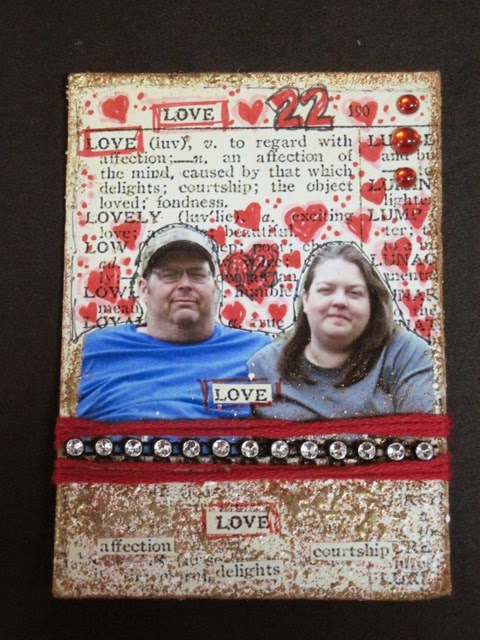
Happy Friday everyone! leslierahye here sharing an anniversary altered trading card. Today my husband and I celebrate 22 years. Over the past couple of years I have  made him Altered Trading Cards to commemorate the occasion and this year was no different. I printed off a recent photo of us and some dictionary paper to cover the ATC base. I distressed the edges and heat embossed on the edges and on the lower third of the ATC. I adhered love words from the definition to the textured surface of the emboss powder and then enhanced the edges and surface with doodles and hearts (there are 22). Bling on a roll and embroidery floss finished off the ATC. This will now become a part of his love collection!

 I hope you enjoyed my ATC! Thank you for stopping by!

Friday, June 13, 2014

Quick and Easy Altered Coaster Gift

 Happy Friday everyone! leslierahye here sharing with you a quick and easy gift idea that is perfect for everyone!! This is a post-it note pad holder. You can decorate them any way you desire, I will share with you the basics today for constructing them. You will need : cardboard coaster [or a 4×4" square piece of chipboard], book paper/music paper or your choice, a binder clip, inks and embellishments [for this I used Ranger Distress Ink and paper ribbon and buttons], an Emory board or sanding block, Plaid Mod Podge or other clear drying adhesive.


Begin by tearing paper and adhering it to the cardboard coaster. You could also just cut a 4×4" square to fit if you prefer. Once paper is adhered, run sanding block or file along edges to smooth them. Ink over the paper for a further aged look. Cut a piece of paper to fit your binder clip and adhere it to the clip...coat the top of the paper as well to seal the paper--this is the part of the project that will be handled a lot and you want to to have some protection.
Find the normal size post-it pads and place on your mini clipboard. Finish off the holder with your favorite embellishments--here I tied some paper string around the clip handle and added some buttons to dangle. Ribbon, string/twine, or bling would also be fun! The sky's the limit! Add a pencil or pen to your project and you have an easy gift to share with everyone!


Tuesday, May 27, 2014

Friendship Fat Book Page

 Happy Tuesday everyone! leslierahye here sharing with you fat book page. A fat book page is like an altered trading card only it is 4"×4". Like an ATC, it is traded among artists--a fun little piece of art. The base of my fatvbook is a piece of book board covered with a piece of vintage advertising paper. I stamped with texture and clock stamps around the page and embossed with a Victorian Bronze powder. Brown die ink was rubbed across the entire page using a cloth to buff the surface of the page. The edges were re-inked and embossed with the same powder. A "friend" text stamp was stamped with Brilliance ink. The crochet trim was died with the same brown ink and adhered to to the page, along with the gold trim, using a white tacky glue. I hope you enjoyed my fat book page and try some on your own!

Tuesday, May 13, 2014

Homes and Abodes


The new Spring 2014 issue of Altered Arts Magazine is available NOW and I am honored to be featured on the cover!!! For this issue focusing on Homes and Abodes I created this fun house from an altered box! I wanted to share with you some of the features : 

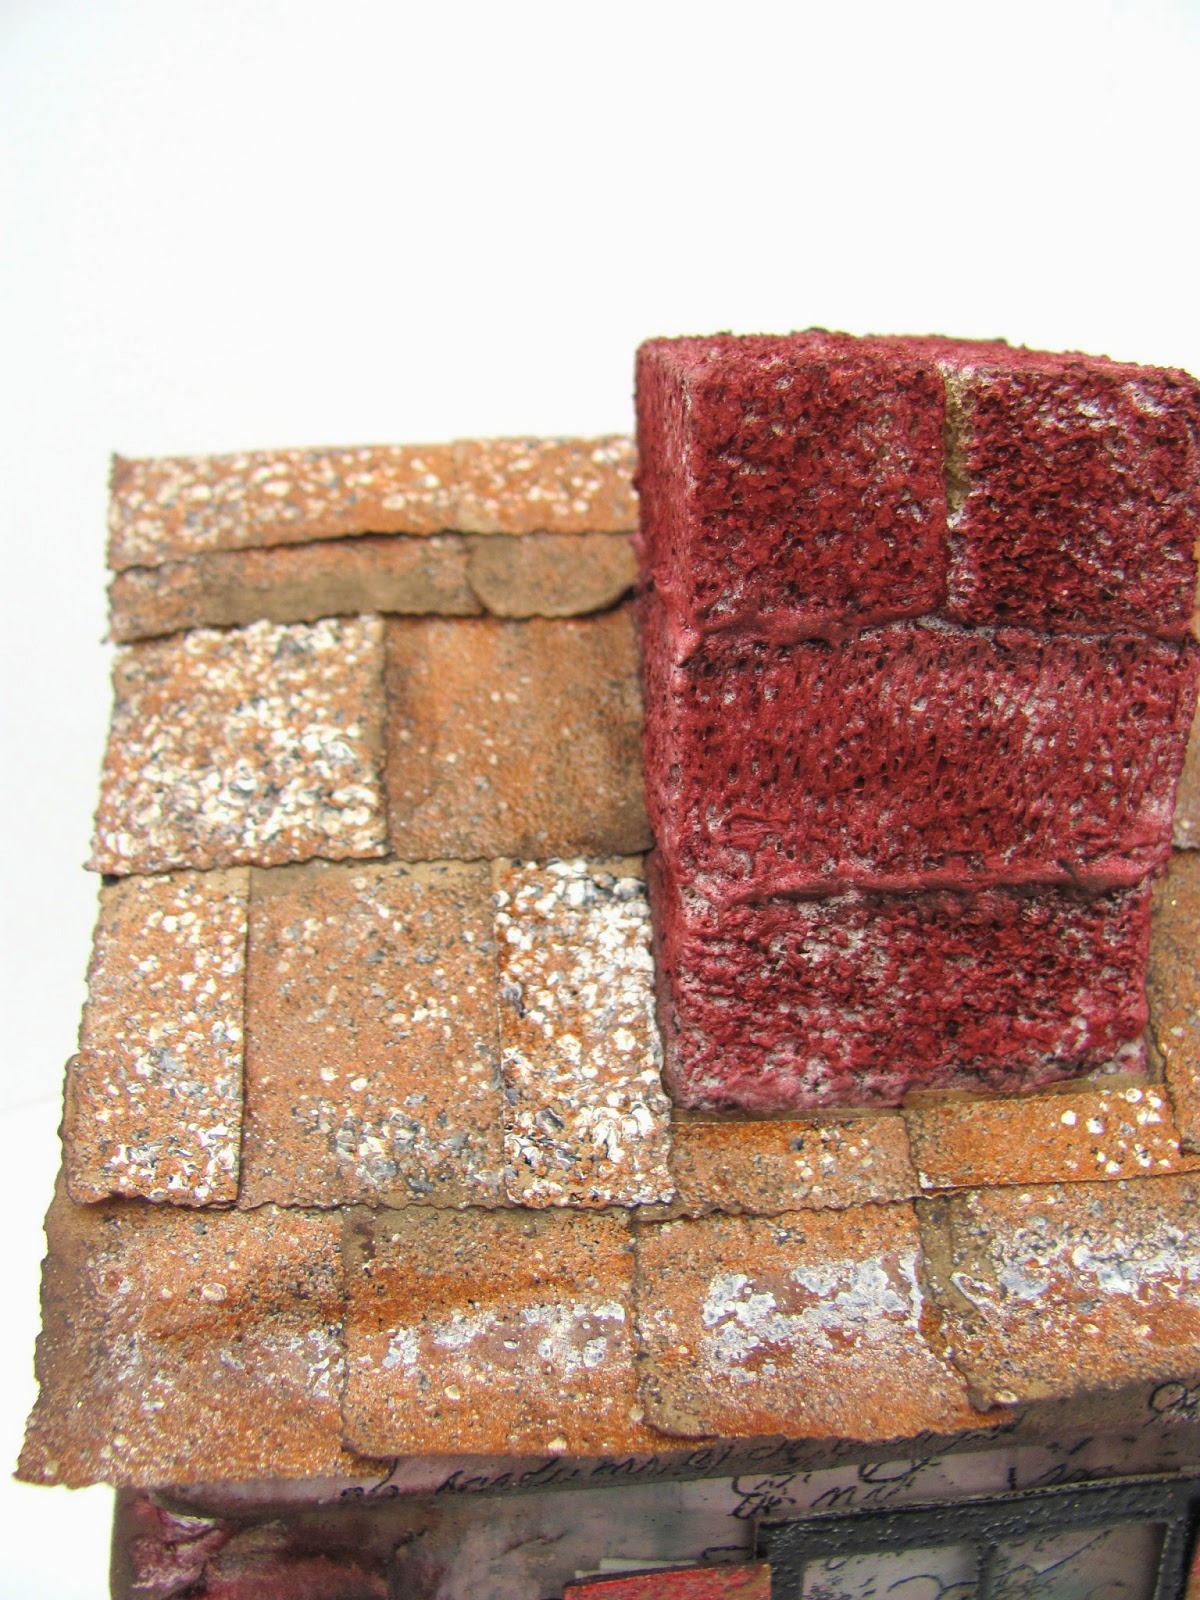
Embossed and shaped die cuts enhance the base of the box.

Foam blocks were carved and covered to emulate painted brick accents. 
Blocks were left raw and colored with chalk to give the impression of raw brick. Tiles were created with embossed brown paper sack!

This makes the perfect place to hide little treasures on a bookshelf! Check out the complete article in the current issue available HERE!


Sunday, April 27, 2014

Spring is Music to my Eyes


 Happy Sunday everyone! leslierahye here sharing with you an art journal page that I did in my K & P Imports art journal. Right now the world around me is bloom with beautiful spring flowers. This is my favorite time of the year to photograph nature. My family often takes a trip out into the county to capture the glory of the wildflowers near us. This page contains one of my bluebonnet photos that I recently took.

I began by creating a watercolor background with layering washes across the page. Once dry, I splattered the same colors from the wash to get concentrated splats of color! After they were fully dry, I doodled a border with black an white paint pens. I fussy cut my photo and glued it down. I then traced around the photo with white paint pen and a grey brush PITT pen. With the paint pen I added the quote "The earth has music for those who listen." The flowers in the fields and along the roadways are a symphony to me. I hope you enjoy my page!

Sunday, April 13, 2014

My Favorite Things ATCs


My Favorite Things Series 1
 Happy Sunday everyone! leslierahye here sharing with you two series of Altered Trading Cards that I recently made to swap. Altered Trading Cards are little artworks on a 2½×3½" canvas. The theme of this swap was "My Favorite Things."

These cards began as a watercolor paper print of mono prints that I had created on gelli plates. When I'm mono printing, I find that there are some prints that I just LOVE and I will scan them so that I can use them in art in the future. The backgrounds I've used here I have used as paper, as digital buttons for events, and as ATC backgrounds. 

Next I heat embossed the cards with some of my favorite Globecraft & Piccolo Craft Emboss Powders. I used adhesive to emboss the edges. Next I sprinkled some emboss powder on the surface of the watercolor ATC and then heat set from below so that the emboss powder looked more random...creating interesting patterning.
My Favorite Things Series 2

Finally I tangled on my ATC. Zentangling and doodling is my happy place and one of my all-time favorite things. I can relax and breathe when I tangle. It seemed appropriate that my two series of Favorite Things ATCs contain tangles!

Each series contained a total of 4 cards and were swapped with friends across the country. It's always fun receiving art from others and ATCs are easy to make and share! I hope you try some of your own!


Sunday, April 6, 2014

Impossible Things Altered Book Pages!


 Happy Sunday everyone! leslierahye here to share with you the completion of my pages created with the niche that I started last month. I left off with the pages gessoed and the base of the niche cut with the boxes placed into the recess.


I began by layering color with Faber-Castell Gelatos and Derwent watercolor pencils. Using a variety of stencils I chalked with Pan Pastels in various places and smeared gently with my fingers. 

Layers of paper, burlap paper and tissue tape were added for more texture both actual and implied. More stenciling occurred. I also inked the edges of the pages and recess with Copper Brilliance Ink. A stamped quote was added on a piece of distressed card stock. 


The "specimens" were cut from a piece of SEI paper and added to the niches in the recess and to the burlap strip below the recess. Mini dew drops from Robin's Nest were added to a few niche boxes as well. 


I hope after the past month you are inspired to try altering a book yourself. Remember "The impossible is often the untried!" Thank you for stopping by!


 Be sure to click below if you missed any of the posts on Altered Books! The team shared lots of tips and inspiration during the month! We hope you enjoyed them!


Thursday, March 13, 2014

Finding Your Niche in Altered Books--a quick how to

Happy Thursday everyone! leslierahye here to share with you one of my favorite processes for altered book making. I love the possibilities of old books holding treasure or chunky items! The stories where people hid money in a secret book compartment or keys to lock boxes and mysteries have always appealed to me. I've been in the homes of my professors and wondered if one of those books on their vast shelves contained a mystery beyond the cover of the book! I was thrilled many years ago when I attended a class at convention about altered books and the instructor shared with us the technique of creating a niche in a book for just such treasures! Over the years I've discovered what works best for me and I will share that with you today along with a few tips I've learned when working with used books.

1niche  noun \ˈnich also ËˆnÄ“sh or Ëˆnish\ 
a :  a recess in a wall especially for a statue
b :  something (as a sheltered or private space) that resembles a recess in a wall

I like to look for books at yard sales, library sales and used book stores. When looking at books I'm primarily looking for the condition of the spine and the type of binding as Kimberly discussed earlier. I am not concerned about stamped pages [like above] or writing in the book as the process to create the altered book will take care of those things. For instance a simple sanding [100 grit nail file] will remove the stamping from the stamped pages. Gesso/paint or other additives such as paper would easily cover up any writing in the book.


Since I am going to be cutting out of this book, I begin by determining how deep I want my niche [in this case ½"-5/8"]. I then find the page I want to start my niche and use foil to protect the rest of the book [I like to use foil because it won't stick to the glue and it I can wrap it around the book]. I then take white glue [PVA, school glue, or like] and generously rub glue on the page edges on the 3 sides of the book. This will hold the book together on the niche part. Depending on the book you might want to clamp it or rubber band it to dry. Some books are heavy enough and the weight of the pages and covers will suffice.

Once dry I get my cork-backed ruler and a utility knife to begin cutting my niche. The cork on the back of the ruler is useful to hold the ruler still especially for the beginning cuts. Make sure you keep sharp fresh blades near at hand...a dull blade not only will not do the job but can also be dangerous when attempting to cut. At the beginning you can simply cut straight down along your niche. As you get deeper in your removal, it is helpful to cut through the middle of the niche [in this case I would make an "x" and remove triangle shaped pieces out!]. As you work down, your corners might look "hairy." A sharp craft knife will help you get into the corners and shape those places better.  The image below shows where the corners have been shaped with the craft knife. Once your niche is deep enough for your item(s) and the edges are neat, use a file to sand any roughness left.

In my niche I wanted to put several boxes to place trinkets and such. I created simple boxes with card stock and folding. I measured my niche and determined what size boxes I would need. I wanted mine to be all the same size. My niche was 4½×5½"--so I made by boxes be ½×1½×2¼". To create these boxes I simply added 2" to the dimensions of the base--so 3½×4¼". The 2 inches allow for me to fold a ½" side on my box.

I scored [using pen in the example so that you can see] at the ½" and 1" mark from EACH edge. I creased my score marks and then folded up the long sides--gluing them to make them sturdier. I cut along the 1" line on the short ends so that I could fold in the flaps and fold the 1½" piece over the flaps. Because I was using card stock I trimmed the flaps so that they did not overlap under the fold over. I cut pieces from the book paper to fit in the bottom of the boxes.


To get my niche ready for my next process, I used an acrylic gesso on the book pages and placed my boxes into the niche to see how they look! As I complete this page I will actually glue the boxes down. I will complete this in my next post at the end of the month and share the rest of the book. I can't wait to add goodies to my shadowbox niche!!! I love how this is coming along! Be sure to check out Designer posts for the rest of the month as the Altered Arts Magazine team takes on Altered Books!

Thursday, February 27, 2014

Upcycled Books!

Good morning! leslierahye here to share with you one of my favorite types of arting : Upcycling!
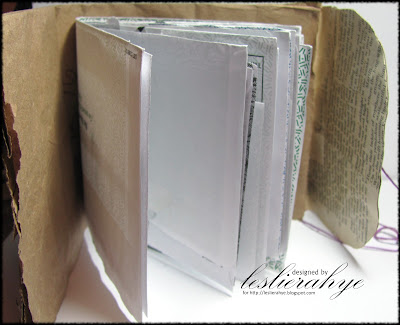
This is one of my upcycled books made from a lunch sack [from take out], envelopes from junk mail and bills, and old book paper.  After trimming the ends and edges of envelopes [leaving some as pockets and some as pages], I punched holes in the middle with my Japanese screw punch and then stitched the pages together and to the paper sack cover. The bottom of the sack was cut on 3 sides leaving a hinged "flap" to make a wrap-around cover. The flap was covered with book paper to provide stability. 


This type of handmade book is great for arting or journaling and fun to give as a gift. Thinner books are great additions to altered books providing artists with extra art space.  They can be glued in on the stitched edge.


Products used in the creation of this journal page : 
all upcycled items : paper sack, junk mail, books

More on tip ins and the ultimate in upcycling--Altered Books--NEXT MONTH as Altered Arts Magazine Blog takes on Altered Books!
Thank you for stopping by! I hope you enjoyed my project!

Thursday, February 13, 2014

A Pattern for Love Journal Page


Good afternoon! leslierahye here to share with you this fun journal page entitled A Pattern for LOVE. I layered pattern paper from a vintage pattern onto my K & P Imports art journal. I layered colors onto my tissue papers and Pink Paislee  Tag with Rangers Dylusions Ink Spray and Tattered Angels Mist. With Prima's Raspberry Red Chalk Ink, I edged the tag and the page and then sprinkled with gold embossing powder and heat set. Next I adhered the tag and some tape onto the page. I finished the page by doodling and writing little quips that provide advice for lovesuch as Be Kind.


Products used in the creation of this journal page : 
Kunst & Papier Art JournalK & P Imports
Designer Dries Clear—Art Glitter Adhesive
Color Wash Tags, Color Wash StampsPink Paislee
Card stock—Bazzill Basics
24K Gold—Globecraft&Piccolo Embossing Powder
Color Brush Twin (Black)c
Mod Podge (Matte)—Plaid Enterprises
Glimmer Mist (Vintage Pink)Tattered Angels
Dylusions Mist (White Linen, Funny Fuchsia, & Cherry Pie)—Ranger Industries
Chalk Inks (Raspberry Pie)Prima Marketing Inc.
Tissue Tape, Pattern Tissue Paper

Thank you for stopping by! I hope you enjoyed my journal page!

Monday, January 27, 2014

Le Pot de Papillon


Good afternoon! leslierahye here with an altered coaster : Le Pot de Papillonthe butterfly jar! As an artist one of my favorite things to do is to upcycle cardboard--coasters from restaurants are perfect! Many are about the size of a fat book (4×4") and make wonderful substrates for small art. 

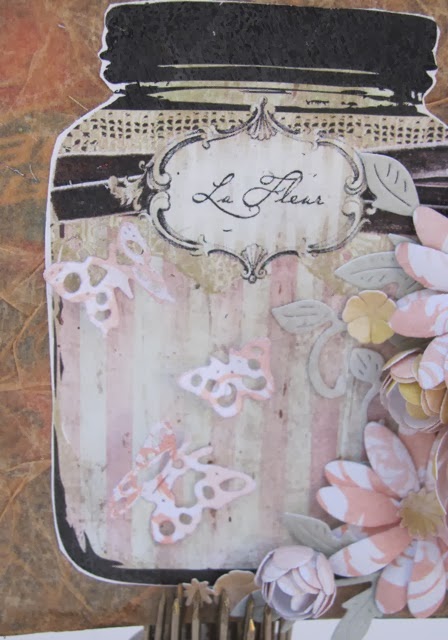
I covered this coaster with 2 layers of Kraft colored Tissue Stock from Canvas Corp using Nori Perfect Paste as my adhesive. I also used the Nori Perfect Paste to adhere the trimmed "La Fleur" mason jar from the Retro Cafe Art Gallery collage sheet. 

I created handmade flowers with the soft subtle Color Wash card stock from Pink Paislee and adhered them to the side of the jar image. I completed the composition by posing mini butterflies in the jar and upon a few flowers. Knotted Wood ink from Prima Marketing Inc. was edged around the coaster to darken the edge a bit.

Products used in the creation of this journal page : 
Vintage French Mason JarsRetro Cafe Art Gallery
Designer Dries Clear—Art Glitter Adhesive
Nori Perfect Paste—Yasutomo
Color Wash cardstock—Pink Paislee
Tissue Stock 12×12 Kraft—Canvas Corp.
Chalk Ink, Knotted Wood—Prima Marketing, Inc.
dies (Mini Fanciful Flourish - B117S, Daisy Strip - B259, Flourish Leaf Strip - B178, Small Heart Lollipop Fringe Cutie - B391, Miniature Rose - B152, Sunflower - DL121, Tiny Flower Kit (Set of 3) - B376 Mini Butterflies w Angel Wings - D138)—Cheery Lynn Designs
coaster, sponge brush


Thank you for stopping by! I hope you enjoyed my altered coaster!

Monday, January 13, 2014

Bringing in the new year with a new Art Journal


Good afternoon! leslierahye here to share with you this fun journal page I created using Graphic 45 Staples, Stampendous! Cling Stamps and Retro Cafe Art Gallery collages. This was the first page of my new art journal and I wanted to capture the essence of this journal with my design. In this journal I will be exploring different techniques throughout the year. 

To create this journal I began by misting the background, lifting off with a towel color to achieve the desired look. Once I was happy with the background, I layered on the Castle Gate image with Mix'd Media Inx. I glued down an ATC sized collage image from Retro Cafe Art and added Graphic45 Staples Flowers. A bit more misting helped to tie the new elements into the page. Once the page was dry, I was able to create some doodling and journaling with my charcoal pencil and white prismacolor pencil. I hope you enjoyed my creation! Thank you for stopping by!

Products used in the creation of this journal page : 
Staples Flowers—Graphic 45
Mixed Grunge Stamped CollageRetro Cafe Art Gallery
Cling Castle GateStampendous!
Kunst & Papier Art JournalK & P Imports
Designer Dries Clear—Art Glitter Adhesive
Charcoal Pencil—General
Pencil (white)—Prismacolor
Mist (Antique Copper)—Maya Road
Glimmer Mist (Vintage Pink)Tattered Angels
Dylusions Mist (Black Marble)—Ranger Industries
Mix'd Media Inx by Donna Salazar (Truffles)—Clearsnap