Showing posts with label Collage. Show all posts

Saturday, June 21, 2014

Altered Magazine Bird Collage


When it's time to choose an image as a focal point for a collage, I often decide to put a bird on it! I love to work with vintage papers, but magazines can provide a wealth of text and imagery for collage art. When I first started using magazines for collage, I was a little concerned that the glossy finish of the pages wouldn't meld with the aged papers I like to use. I soon discovered that a bit of paint and ink can completely transform a magazine image and make it blend right in with the other collage elements.


I found the image for my most recent collage in the pages of Birds & Blooms magazine. As the title indicates, it's filled with colorful pictures of birds, flowers, and other nature-inspired images and text. I often find back issues of this magazine at library sales, so it can be an inexpensive and bountiful source for collage material.


Some of the other fun elements I included in this particular collage were vintage wallpaper from an antique shop, and some Chinese calligraphy paper I found at a wonderful store in Portland, OR called CARGO. I used a white Uniball Signo pen and a gold Uniball gel pen for the lettering and the pen work that added the finishing touches to this collage. If you have a favorite subject for your artwork, don't hesitate to hunt for magazines on the topic. You'll be sure to find lots of great images that you can easily alter and use for your collage and mixed-media projects.
Have fun cutting and pasting!
Kimberly

Saturday, May 17, 2014

ENCAUSTIC COLLAGE

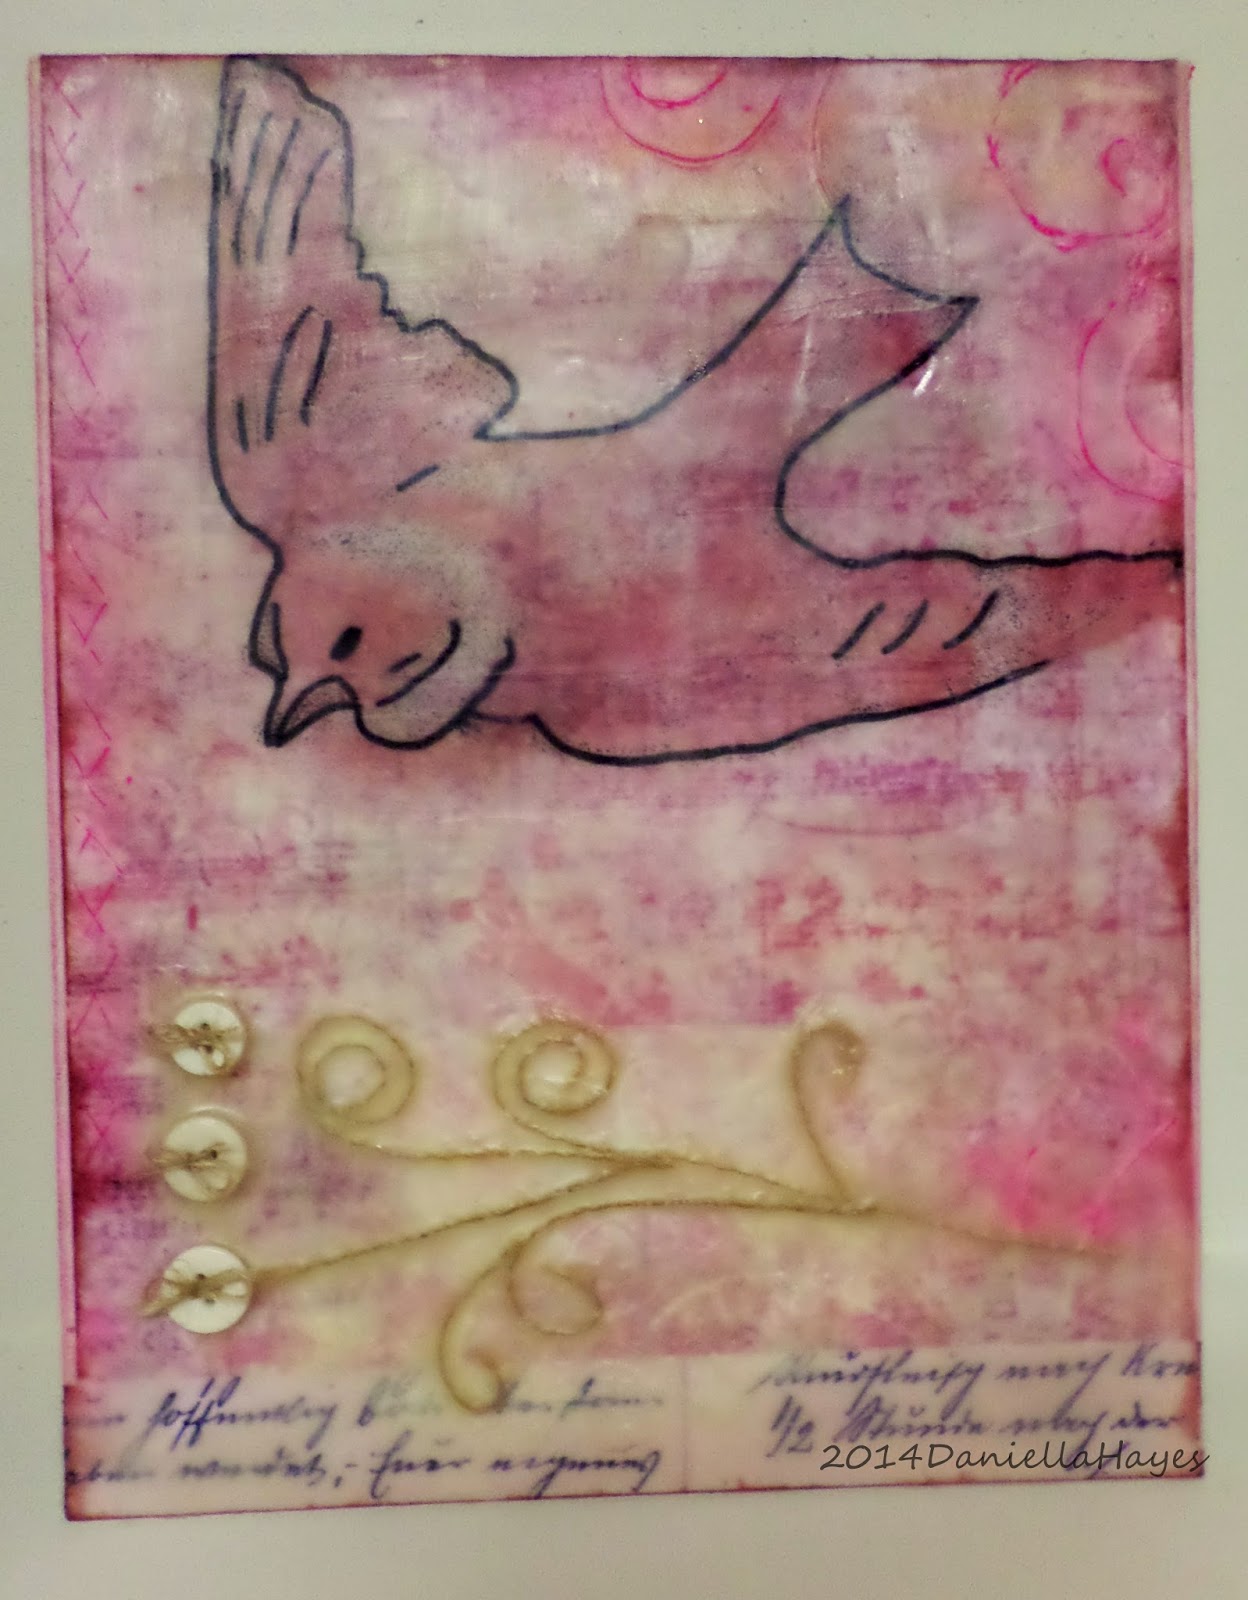
I have been curious about encaustic art for some time.  Working with wax seemed like something I would like, but I needed more information.  So I got a DVD and learned all about it.  This is what I made.
Not bad for the first time, I think!

I learned that you have to combine bee's wax with damar resin for this medium.  The resin helps the wax to stick and not flake off.  You need a heat source, like a hot plate, and something to melt your wax in, like a metal pan.  It should heat to 220 degrees.  It takes about an hour to melt.


While you wait, start your canvas.  You need to use a porous surface, like wood, fiber board or clay board.   This is a great way to use up some of your scraps.  I went to my scrap basket and picked out some pieces.  Apply them with a regular craft glue or gel medium. Don't get any on the outside of the paper.  Glues and mediums contain water, and wax and water don't mix.  Let your papers dry fully.  Be sure to remove any air bubbles. 

Let your papers hang over your surface.  When it is dry, flip it over and remove the excess.  I also added ink around the edge of the board.   Now you are ready to apply wax.

I was surprised to find out you can't just apply layers of wax on top of each other.  You have to fuse each layer.  Fusing is done with a heat tool.  After you apply a layer of wax, you use a heat tool to melt it a little bit, so it is fully adhered   You want the wax to be a little shiny for a second.  If you go too far you can burn the wax.  When applying the wax, use large strokes and get across the whole canvas.  You don't want to miss areas or leave too many heavy areas.  You will have brush marks too, and the fusing helps smooth your wax out.  I started with 2 layers of wax.

After the 2 layers were fused, I outlined my bird and added highlights.  Since wax is always tacky, I was able to add the burlap strings in a flourish kind of way. I used a little wax to apply the buttons and went around them with more wax on a small brush.  I went over the whole piece 2 more times, fusing between layers.  When it was dry I incised a few areas and added oil pastel to the cut out areas.  After using oil pastels, remove excess with vegetable oil.

And that is how I used encaustic medium to make a collage.  I am very proud of my first attempt.  I can see this medium being addictive.  There are far more elaborate things you can do with wax, but this simple tutorial is a wonderful beginning, with a very easy learning curve.  

Have fun!!

Wednesday, May 7, 2014

Altered File Folder 6 Pocket Book


A happy day for me is spent cutting, pasting, painting, collaging, and making books! This altered file folder project combines all my favorite things in one colorful package!


I was inspired by these pretty papers from Lawn Fawn to use red, black, and a dash of blue for my main color palette.


The base for the book is a standard manilla file folder. A few simple folds are all you need to turn the folder into a book with 6 pockets! You can score at the fold lines if you wish, but I just folded away and burnished the fold lines with a craft stick. I prefer to make the folds before I begin adding any collage materials. The folder will be a bit bulky once you've added all those layers of paper, tape, and paint, so it's easier to manipulate if the folds are already created.


I added layers and layers of torn paper, acrylic paint, gesso, tissue paper, along with Washi tape, fabric tape, and masking tape. Just play with your favorite materials and techniques until you've covered all parts of the folder, or just the parts that will be seen if you prefer!


The inside of the book has two pockets. I tucked in some glittery postcards from the amazing Book for Paper Lovers by Flow magazine, and a quote from that same book that I cut apart. {See a flip-through of this fabulous book on my Instagram account @artfullvintage}


Here's the back cover of the book. The glittery postcard is tucked into one of the side pockets, and a large manilla tag is in the other pocket.


Creating the side pockets is very simple. Just add double-sided tape to the top and bottom edges of the folder as shown. I'm showing the plain folder here, but be sure to add the tape AFTER you have finished collaging the folder!

I hope you enjoyed this fun and easy project and that you will make some file folder books using your favorite colors and materials. Happy altering!
Kimberly

Monday, April 21, 2014

Citra Solv Adventures


Citra Solv is a natural cleaner with a wonderful citrus scent. But I didn't break out my bottle for spring cleaning! This versatile product is an amazing tool for creating artful backgrounds, ATCs, image transfers, and so much more!


I created these dreamy backgrounds using nothing more than a generous application of Citra Solv on some pages in an old copy of National Geographic. Simply fill a spritzer bottle with some of the cleaner, liberally coat several pages of your choice in the magazine, and allow the pages to mush together for 10-15 minutes. {If you prefer, you can directly apply the Citra Solv with a foam brush} Open the pages, mush together some more if you wish, and then soak up any excess ink with paper towels. Tear out your favorite pages, allow them to dry, and you will have several unique backgrounds for your art! The process can be quite messy, so be sure to cover your work area with newspapers for easier clean-up.


Here are a couple of pages I created for my art journal using the backgrounds and an image transfer of a bird from The Graphics Fairy.


Creating an image transfer using Citra Solv is a very simple process. Just follow these easy steps:
  • Print out an image using a laser printer, or get one made at a copy shop or your local library. The ink used needs to be toner-based to work, so don't use copies from an ink jet printer. Be sure to reverse the image when printing, especially if contains any text.
  • Place the image face down on the desired surface, saturate a cotton ball with Citra Solv and rub it all over the paper until the image is clearly seen. Wait a few seconds, and then gently burnish the image with the back of a spoon. You may lift the corner of the paper to make sure the ink is transferring from all parts of the image.
  • Lift the paper and a beautifully imperfect image will appear!
The process is very unpredictable, but very satisfying! You never get the same results twice, so these transfers are a sure way to add unique images to your ATCs, art journal pages, collages, or other mixed-media projects.


I've been experimenting with Citra Solv image transfers on fabric and paper for a workshop I'm teaching this Tuesday at Ephemera Paducah - Stitcher's Stash Journal. I altered this image of roses in Romantic Homes magazine by gently rubbing it with just a bit of Citra Solv on a cotton ball. And I love the image transfer of a dress stand on Stonehenge paper! Some tips to remember when creating image transfers are:
  • Don't use too much Citra Solv or the ink may run, causing the image to blur or parts of it to disappear completely.
  • The fragrance is very strong, so be sure to work in a well-ventilated area.
  • Black and White images usually work best for this process.
I purchased my Citra Solv at Jerry's Artarama in Nashville, TN, but you can find a list of online and brick-and-mortar vendors who sell the product hereI can't wait to demonstrate these fun techniques, and I hope you will try them out for yourself too!

Until next time: Make Art...Be Happy!
Kimberly


Monday, April 7, 2014

Red, Black, & Cream Collage Journal


I love to dabble in arts and crafts of all kinds, but collage is my true love! My art never feels complete without the addition of paper of some type, and I love the mysterious layers and hidden meanings contained in collaged pieces.


Over the years I've gathered a rather large stash of materials including: vintage ephemera, sewing notions, scrapbook papers, and a wide variety of embellishments. When I sit down to create something, I appreciate all this bounty, but it can be a bit overwhelming! To overcome this happy challenge, I like to set a theme for myself. I may choose a particular motif to highlight, limit myself to 3 or 4 types of materials, or my favorite - select a color theme.


For the journal I'm sharing today, I chose one of my favorite color palettes: red, black, and cream. Even with a restricted color theme, the possibilities are still endless! In this journal I've used Citrasolv transfers, ice resin papers, vintage flashcards, sewing pattern tissue, all sorts of papers, buttons, ribbons, and so much more! It's a fun way to use up your stash and create something meaningful to you at the same time.


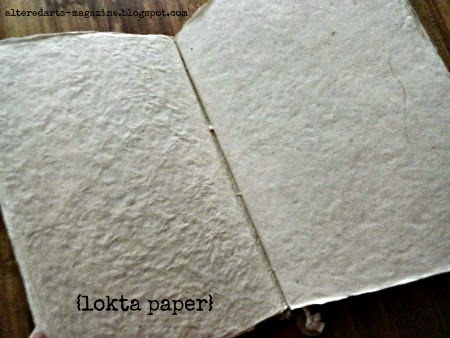
My other artful passion is creating my own handmade journals. But sometimes I find a special book like the one above that I want to use instead. I loved the nubby texture of this journal that I found at my local Barnes and Noble bookstore.


And the handmade Lokta paper inside is simply gorgeous! This book was lovingly hand-stitched, and is the perfect foil for my red, black, and cream pages. Next time you're ready to be creative, why not give yourself the challenge of a color scheme or theme that you love? You'll be surprised at how the ideas start to flow when your options have some boundaries!

Make art...be happy!
Kimberly

Friday, March 21, 2014

{Altered Books 101} Cover Story


The cover of an altered book often tells a story about what's inside. I chose a theme of Lost & Found for this book, so I wanted to embellish the cover in a way that reflects that idea. This book is all about the lost or discarded objects I love to find and collect for my art. I used some of those treasures for this cover, along with a few new tools and supplies to create a story that offers a glimpse of what's inside.


I loved the marbled turquoise cover of the Reader's Digest that I chose for this project, so I didn't want to cover it completely and lose the pretty pattern. Inspiration hit via Daniella's post about using tissue paper to cover her altered notebook! I covered the spine with a page torn from an old French book, and then I layered over the entire cover with tissue paper from 7gypsies. Matte gel medium from Liquitex worked well for both types of paper. I tore the edges of the tissue paper deliberately, revealing bits of the patterned cover and that gorgeous color!


A metal tag from Graphic 45 perfectly represented the sub theme of locks and keys found in the pages of the book. I used letter stamps from a fabulous vintage printer's set I recently scored on Ebay to stamp out the Lost & Found title. One of my favorite tips for using letter stamps is to choose the word you want to use, line up the letters, and then wrap the stamps together with Washi tape. This makes it so easy to stamp evenly spaced text! Some vintage trim from my stash and the word "Journal" stamped on a piece of cotton fabric finished off the cover.


I loved the 7 Gypsies tissue paper so much that I decided to use to create 2 simple backgrounds for the inside pages. I layered it over a piece of the French book page on the right, and directly on the book text on the left. Painted paper doilies and a bit more old book paper complete this set of backgrounds.


A page torn from a vintage postcard album that I found at an antique store and some of my cherished Liberty London fabric tape made for a quick and easy background! I can tuck a photo or a postcard in the grooves of the postcard page, or even some altered tags or ATC cards.
I hope you've enjoyed my posts during Altered Books Month here on the blog! I've learned some fun techniques from my fellow Design Team members that I can't wait try for my own books.
Until next time - make art...be happy!
Kimberly


Monday, February 24, 2014

Altered Books - Preview


Altering books begins in my dreams.  I can express feelings, thoughts, and ideas within a cover.  It is almost like re-writing a book!  Notice how I incorporated the text in my art - "Creative Energy" is the title!

Next month is Altered Arts Magazine's Altered Book Month.  During this month, all posts will be related to anything and everything altered within books!

I have been altering books since the mid 1990s.  An artist's group I belonged to rescued a large amount of books from a library.  They were books that were old, and couldn't be sold, so they were going to be thrown out.  It felt amazing reclaiming these books.  To us, they were another canvas that is bound,  a way to carry and display art easily.


This altered book is from 2005, an art piece published in Altered Arts Magazine.

My favorite part of altering books, is the "round robin" aspect of creating.  All the artists involved did art on several pages, then passed the book to another artist.  When it was all done, each person who participated had a book filled with designs from several artists!  Breathtaking to display, inspiring to see the many styles of creating.


Altering encompasses any type or style book.  Paperback books, hard covers of various sizes, or even fabric books!  I have also saved ledgers, foreign books and have ripped pages out to re-use in other books. We revisit my favorite theme of upcycling - transforming items that would normally be thrown out.

In the next month, I want to showcase various techniques, tools, and media to inspire those wanting to delve into the unlimited realm of altered books.  The whole design team will cover all these various aspects with their own style and flair.  This gives the reader a great deal to choose from!


Not sure how to start?  Check out Kimberly's post on how to choose a book for altering!  This is a great post describing how to choose from the vast amounts of old books begging to have art created in it!!

For a beginner, the book above is a perfect way to start.  Contemplate collage and begin there.  After adhering several pages together (Check out a March post to learn how.), inks, paints, stickers, and embellishments were manipulated on the page to form the design.  Basic design ideals of symmetry, contrast, and repetition give the page a pleasing overall look.

Create your own gallery of art!  Display your books around the house.  Join a round robin so you have designs from several artists!  Not only are altered books like a journal housing your expressions, it is an easy way to keep themes or various art creations together.

Until next month.....


Cre8tivelea Yours - Lea


Friday, February 7, 2014

{Altered Books 101} Choosing a Book to Alter


A mysterious alchemy occurs when a book is altered. Suddenly, an object that was destined for the landfill is transformed into a piece of art and rescued from oblivion. Altering a book simply means changing its appearance or structure into something new using a variety of media and techniques. An altered book can be torn, painted, burned, collaged, have pages removed or added, or even be cut into an entirely different shape.


I fell in love with altered books many years ago, but I still hesitate a bit before I start a new one. I am passionate about books, and love and respect them deeply. That means that ripping them apart or marking in them with ink or paint can feel a bit strange! The end result is very satisfying though, and I prefer to believe that I'm rescuing books rather than destroying them. I choose the books that I alter very thoughtfully, and of course I would never use a rare edition, or valuable book. Instead, I focus on books that are tattered, worn, outdated, or no longer useful.


Choosing a book for altering is an adventure! I love digging through antique shops, thrift stores, rummage sales, or library sales for books that I can use for collage, handmade journals, or for altering into art. To make it easier for you to choose your own books for altering here are four basic criteria to consider, and a couple more suggestions for types of books to use.


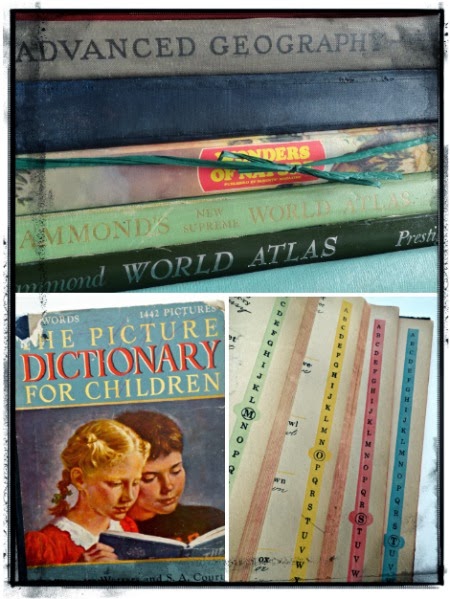
Size is the first factor we'll consider. Larger books obviously provide a bigger canvas for your techniques and art work. Atlases, outdated textbooks, and children's encyclopedias are some fun examples of these types of books. I love the children's book shown above that I found at an antique store recently. The charming illustrations on the cover and the colorful pages are perfect for altering. Large books have lots of potential, but smaller books are more portable and easier to display and store. Both have their place depending on the project at hand.


Ah...Reader's Digests! If you're a bit concerned about altering a book, these are the ideal choice for you. They're inexpensive and readily available at the sources I mentioned, or even online at sites like ebay. Reader's Digests often have lovely covers and end papers that can serve as beautiful backgrounds for your art. These books were mass produced so there's no need to feel guilty about using one as a creative base.


A second way to select a book is by color. I'm especially drawn to books that have white, cream, blue, or green covers, so I have quite a few of those in my collection. Color doesn't have to be a consideration however, because any book you find can be altered with paint, paper, or other media.


Collecting books by theme is a third and especially fun way to choose a book. Gathering books this way insures that you will have plenty of text and images for your art that reflect your interests. I can't pass up a book about birds, and I recently started looking for books about sailing. I enjoy using both these themes as motifs for collage, sketching, and painting. I also enjoy books about gardening, travel, vintage cookbooks, and music. Look for books that cover topics you are interested in, and they will be a pleasure to alter.


A fourth way to choose a book is to use one that has personal meaning for you. You may be drawn to a book for its title, subject matter, illustrations, the cover art, or even a childhood favorite. Of course, you can use your own treasured book, but I sometimes prefer to find another copy for altering. I've had the two books shown above since I was about 10. So even though they bear my daughter's name and would make a sweet journal for her, I may decide to find another copy and keep these as mementos. Children's classics are usually inexpensive and easy to find at used book stores or antique shops.


A wonderful type of book to consider for altering is the dictionary. They're available in a variety of sizes, colors, languages, and formats. Dictionaries contain loads of text and even images interspersed throughout their pages. Choose a page to alter that has a word or definition that pertains to your art work for adding depth and meaning.

Children's board books are another fun option to consider. Search dollar stores or yard sales for inexpensive copies. These books often have interactive elements like flaps, pockets, spinners, or fold-outs that can make your altered book interesting and unique.


When it comes to altering books the sky's the limit! I hope you enjoyed this glimpse into what I've learned about choosing books for altering. Next month, I'll share techniques for preparing books to be altered and some fun backgrounds to get you started. March has been declared Altered Books Month, here on the Altered Arts Magazine Blog, so be sure to pop by throughout the month for more inspiration and ideas from all the design team members.


Make art...be happy!
Kimberly


Saturday, February 1, 2014

a "love"ly collage . . .

Sorry, yes, I know, bad pun--but it's February now, and I'm thinking
of Valentines (and warmer weather) . . .
LOVE stamp and vellum bunting by Pink Paislee
wallpaper stamp by Something Tattered
collage image from Altered Pages
Now here's the question--make this a card front, or turn it into a hanging?
It's only 5 by 8 inches, so either way . . . what do you think?

Have a wonderful, creative Saturday, everyone!
:)trisha


Tuesday, January 21, 2014

Altered Birch Magnets


The moment I spotted these birch discs at Michael's, I knew they would be perfect for altered magnets. Add in a collage sheet from ARTchix Studio, and you have a quick and easy project to spruce up your memo board!


Here are the birch discs before altering. So many possibilities! I think these would be sweet for pendants or charms too. I love the little squiggly bits of bark, so I left those, but you can easily snip them off for a cleaner look.

Altered Birch Magnets Supplies by Kimberly Jones

To create some magnets for yourself or a friend you just need a few basic supplies:
*Collage Images - "Lovely Lenses" ARTchix Studio
*Birch Discs
*Sharp Detail Scissors {Or a circle punch if you prefer}
*Gel Medium or Decoupage Medium {I used Liquitex Matte Medium, but any kind will work
*Inexpensive Paint Brush
*Embellishments {rhinestones, beads, buttons, etc.}
*Tacky Glue - "The Ultimate" - Crafter's Pick

Altered Birch Magnets Tutorial by Kimberly Jones

Follow these steps to create the magnets:

*Begin by selecting the collage images you want to use for the magnets.
*Cut or punch out the images to fit on the birch discs.
*Use gel medium to glue the image to the disc and add a coat to the top to seal.
*Add embellishments with tacky glue.
*Add a self-adhesive magnet to the back of the disc.

Some fun alternatives for the collage images would be monograms, buttons or other embellishments, found objects...the list is endless! I hope you enjoyed the tutorial and have fun making your own magnets!

Kimberly